The Rapid Elearning Blog

Archive for the ‘Articulate Storyline’ Category


360 images AI

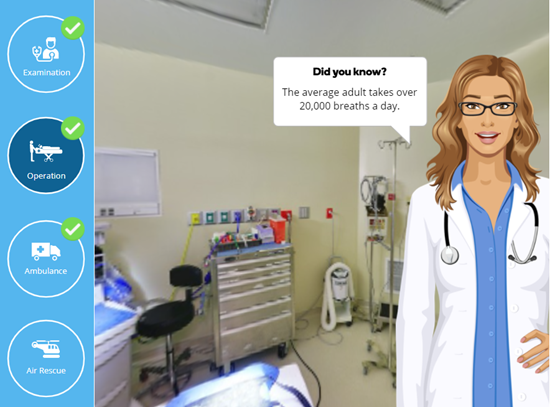
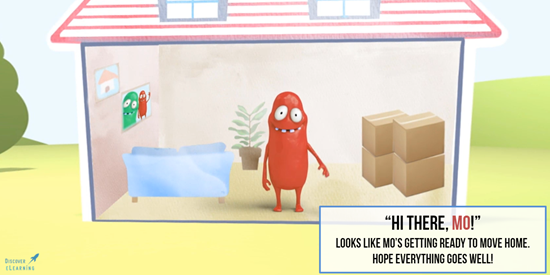
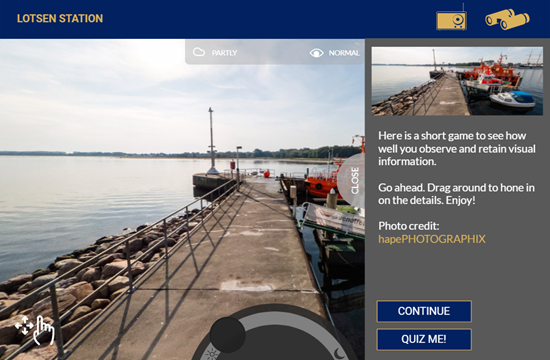
There are a lot of really cool things you can do with 360° images in e-learning. You can see some examples here.

However, I’ve chatted with a lot of people and the single biggest challenge for them is getting usable images.

In most cases, 360° image interactions are exploratory and based on real-world context. In those case, stock imagery doesn’t work. This requires that the course author have a camera or other means to craft the images. However, it doesn’t mean you can’t create an interaction using stock 360° images.

Here is a cool site that creates stock 360° images using AI. The steps are simple:

  • Add a prompt and the site creates the imagery.
  • Download the image.
  • Insert into your course.
  • Build the interaction.

Here’s a simple example where I used the AI generated images and inserted them into Storyline 360.

AI generated office tour

Click to view the example.

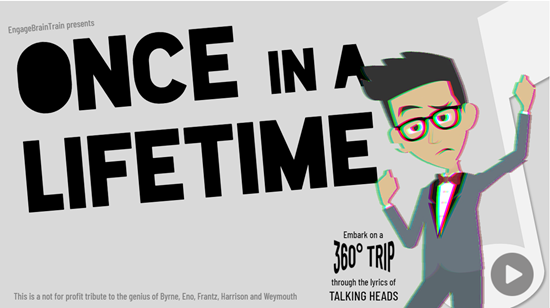
And here’s an example, recently shared in the community by Julie Bigot for the challenge we had on using AI in e-learning.

example AI demo

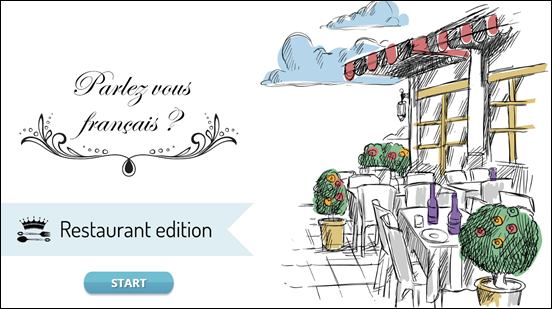
Click here to view the example.

Working with AI

A few key tips working with AI:

  • The power is in the prompt. There’s a lot of trial an error in figuring out how to get the right imagery. Although, now AI can also help you craft the right prompts for your images.
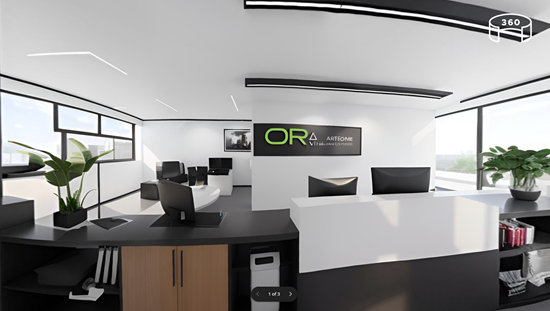
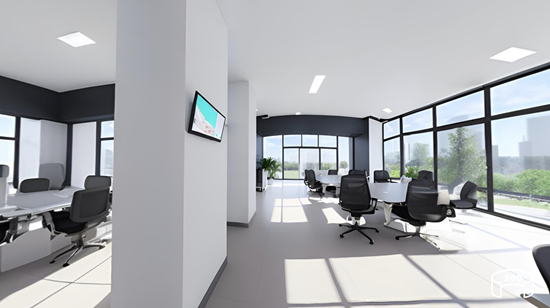
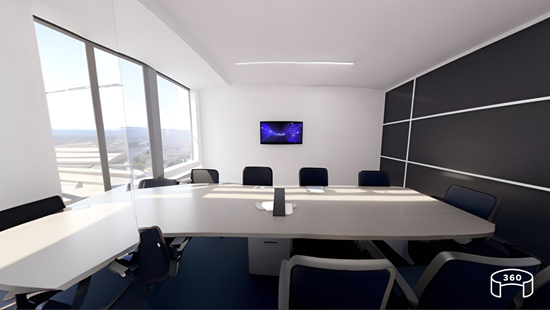
  • Craft a prompt and then use it to create complimentary spaces. In the examples below, I kept the prompt simple: modern business office. The first image produced a very distinct black and white office.

AI office

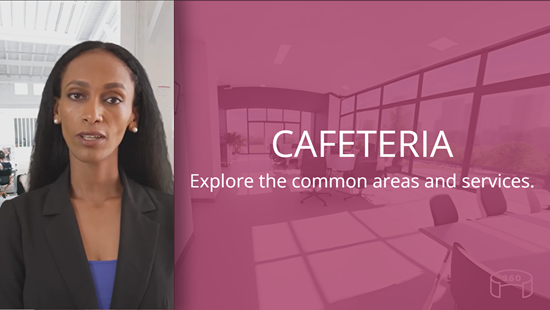
  • I wanted similar looking rooms that may look like they were part of the same office so I appended “modern business office” with other words such as meeting room and cafeteria. Surprisingly, as you can see from the images below, the rooms are very similar and usable. Normally, the prompts have to be more descriptive.

AI office

AI office

AI office

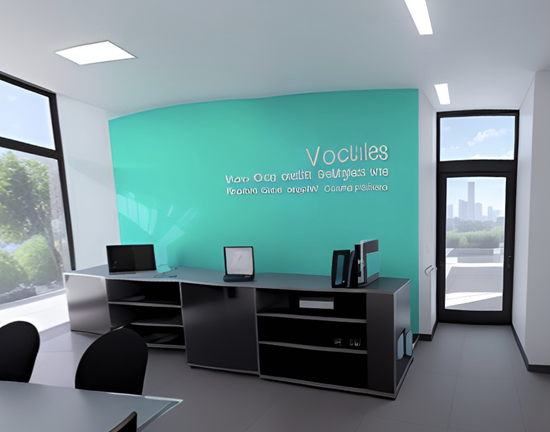
  • Sometimes you may get artifacts in the 360° images. You’ll notice my image below had some gibberish text on the wall. Those can be edited in an image editor. Here’s a tutorial that explains some options.

360° image needs editing

If you need to create 360° images for your e-learning interaction, this is a cool site to explore. Hope it helps.

Events

Free E-Learning Resources

Want to learn more? Check out these articles and free resources in the community.

Here’s a great job board for e-learning, instructional design, and training jobs

Participate in the weekly e-learning challenges to sharpen your skills

Get your free PowerPoint templates and free graphics & stock images.

Lots of cool e-learning examples to check out and find inspiration.

Getting Started? This e-learning 101 series and the free e-books will help.


How to View Old Flash Courses

February 15th, 2022

view swf flash files

The death of Flash has created a mess for many e-learning developers who have to look for things in older e-learning courses that were published in Flash.

I run into that a lot in the community and with some of my old demos on this blog. It sure is a pain. Not being able to see the file makes it a challenge to recall what was in it or to even know what to look for to update it and republish.

The good news is that I found this thread in the community recently where Sarah shared a link to a Flash player that may help you view old courses. Below is a quick tutorial on how to use it.

Click to view the tutorial.

There’s no guarantee that these links will work forever, I’d download them now, so you have a copy.

Hope that helps those who need to view older Flash courses.

Events

Free E-Learning Resources

Want to learn more? Check out these articles and free resources in the community.

Here’s a great job board for e-learning, instructional design, and training jobs

Participate in the weekly e-learning challenges to sharpen your skills

Get your free PowerPoint templates and free graphics & stock images.

Lots of cool e-learning examples to check out and find inspiration.

Getting Started? This e-learning 101 series and the free e-books will help.


360° Image e-learning

Storyline 360 includes a 360° image feature where one can insert interactive markers and labels. On top of that, one can also leverage all the other capabilities of Storyline and layer content on top of the image.

Last week, the e-learning challenge was to create some 360° image interactions. Some of the submissions intrigued me with how they used other layers and variables to track movement through the 360° image.

Here are four examples from the weekly challenge that demonstrate this:

360° Image Example: Once in a Lifetime

e-learning 360° images

This is a bit playful and outside the realm of e-learning, but what I like is that it’s a clever way to navigate through content. Each image represents one point of content versus a series of interactive markers and labels.

View 360° image example via Jonathan Hill

360° Image Example: Medical Industry

360° image example e-learning

This example shows some interesting ways to use variables throughout the interaction with the 360 image. It tracks movement, varies content displayed, and also includes some assessment.

View 360° image example via Montse Anderson

360° Image Example: Mi & Mo

360° Image example e-learning

This is another playful example that integrates animation and other layers rather than the default labels to collect information.

View 360° image example via Chris Hodgson

360° Image Example: Lotsen Station

360° Image

This demo is close to the type of interactions one might build in a real e-learning course. There’s layers of information and other clickable content, interactive dials, and an easy-to-spot quiz.

View 360° image example via Samuel Apata

This is just a sampling. There are a lot of other interesting ideas in the e-learning challenges, like this one with the fish animation. So be sure to check them out.

After looking at some of the demos, I am curious about how people actually use the 360° images in their e-learning courses. Are you using them to explore the office or facility? Are you using them to identify issues in the environment such as find the fire hazards? Or are you doing something novel?

If you use 360° in your courses, please share how you’re using them and any other recommendations.

Events

Free E-Learning Resources

Want to learn more? Check out these articles and free resources in the community.

Here’s a great job board for e-learning, instructional design, and training jobs

Participate in the weekly e-learning challenges to sharpen your skills

Get your free PowerPoint templates and free graphics & stock images.

Lots of cool e-learning examples to check out and find inspiration.

Getting Started? This e-learning 101 series and the free e-books will help.


e-learning interactions

In a recent workshop on creating interactions, we looked at ways to take a single image and create interactive content. It’s a good practice activity because many of us aren’t graphic designers so it helps us see different ways to use stock imagery that doesn’t require a lot of editing. And it gets us to think about interactive content in ways we may not initially consider.

The general idea is to find a single image that you can use for an interaction. A few things I look for:

  • Visually interesting. I’m not a graphics designer and design fashion changes every few years. I try to find images that feel new and modern.
  • Content areas. Since I’m using a single image and it’s the unifying graphic, I look for places to add content. Sometimes it does require placing a box or some other container shape over the image, but I try to find open space in the image that works for content. In the three examples below, the computer has a good content area, the teens illustration has a middle section that is empty, and for the business collage I created a side panel.
  • Visual context. Try to find images that offer visual context so it fits the context of the course content. Generic things like offices and desks work great.

Here are three examples that we’ve covered in the past that demonstrate this idea of using a single image with some interactive elements.

Exploratory E-learning Interaction

zoom office e-learning interaction

Click here to view the demo interaction.

In this example, a single image provides some office-like context. This could be used as an exploratory interaction, when clicking on objects exposes additional content. Ask a question. Looks for clues to answer them.

Original post: Create an Interactive Course Using a Single Image includes free download.

Meet the Team E-Learning Interaction

meet team e-learning interaction

Click here to view the demo interaction.

The original example was used to highlight counting clicks with variables. However, the single image could be used to click on a character to glean more content such as a “meet the team” activity. The center area is a perfect place to display content.

Original post: E-Learning Tutorial – Easy Way to Make an Image Interactive

Business Collage E-Learning Interaction

business e-learning interaction

Click here to view the demo interaction.

I like these types of collage images because there are plenty of those types of images to be found. The original was built in PowerPoint. The demo above was rebuilt in Storyline. Here’s a download with both files if you want to deconstruct them.

Original post: Here’s a Simple Way to Convert Your Course to an Interactive Story

Hopefully, this gives you some inspiration. If you want a good starting point, do an image search for collages and you’ll find some interesting ideas.

Events

Free E-Learning Resources

Want to learn more? Check out these articles and free resources in the community.

Here’s a great job board for e-learning, instructional design, and training jobs

Participate in the weekly e-learning challenges to sharpen your skills

Get your free PowerPoint templates and free graphics & stock images.

Lots of cool e-learning examples to check out and find inspiration.

Getting Started? This e-learning 101 series and the free e-books will help.


audio narration tips

In e-learning software like Storyline 360 and Rise 360 you can record (or import) audio narration into your courses. Since many e-learning developers tend to produce all media that belongs in the course, recording audio narration usually is one of those responsibilities. That means there are a lot of people that record audio narration who aren’t trained voice over talent.

If you have money and the time, using professional voice over talent makes sense. But most of us don’t have that luxury. So here are some tips to help you get started and get the best audio narration that you can get.

Audio Narration Script

  • Script approval. Narration (especially for non-professionals) can be time-consuming. You don’t want to do a lot of re-work. Get the script approved before you start any work on recording the narration. That will save a lot of time.
  • Text-to-speech. Use the text-to-speech feature to create demo narration for the review process. This way the subject matter experts and reviewers can hear the script and not just read it. And if you need to make changes, it’s just a matter of typing new text and not going through the process of recording new narration. Settle on a final, signed-off script.
  • Sound like a real person. Audio narration should sound like a real person. That means you need to move past the legalese and corporate way of saying things (assuming the legal department lets you). Write a script that sounds conversational and how you would talk and explain things in real life.

The Right Environment to Record Audio Narration

In an ideal world, you have a recording studio or one of those fancy whisper rooms. But odds are you have a cubicle or empty conference room.

  • Cubicles are good. The walls are designed to absorb sound. Unfortunately, in an open-air cubicle farm, you don’t get a lot of privacy and there’s a lot of background noise, so you’ll need to record when there aren’t many people around.
  • Minimize noise. Turn off office machines, fans, and air conditioners (if possible). Record about 15 seconds of ambient noise. Sometimes you can use that to create a filter and edit out the background noise when you do post-production. But the best option is to record the best quality you can. As a general rule, the best recording is the original recording.
  • Use sound buffers. Listen to the difference between using a sound box and not. There are several ways to buffer the sound coming into your mic. There are professional options with sound proof panels, mic boxes (you can make these with a fabric cube and foam wedge panels), and panels that connect to your mic. In my home office, I have a clothes rack and drape a thick blanket over it. Then I roll it behind me. Here’s an emergency option: the foambrero. If you have a budget, this recording booth looks interesting and seems very portable and easy to set up in a small office.
  • Headset mic. Sometimes you’re stuck in an office and cannot control the background noise, but a headset mic helps because it is unidirectional and will only record audio from one direction. This helps block out a lot of ambient noise.

Prepare Yourself to Record Audio Narration

  • Read the script aloud a few times. You’ll quickly identify areas where it doesn’t sound natural and when it doesn’t roll of the tongue right.
  • Record it first so you can hear it back. Just the act of recording often helps identity where it doesn’t sound right and where you flub over words and sentences.
  • Drink plenty of water. Hydration is key.
  • Don’t worry about being perfect. Remember, you’re not hiring a pro, so you’re not getting a pro.
  • Stand rather than sit. Standing helps you breath better and take in more air. The most important thing is to be comfortable and of course being able to reach your audio controls between takes.

The Right Tools to Record Audio Narration

I created a list of good audio accessories and mic recommendations that won’t break the bank. And there are plenty of affordable or DIY options like building a sound box or using an Ikea lamp as a mic boom. Regardless, here’s a general rundown of what you’ll need:

  • Good microphone: headset or desktop. I usually prefer a desktop mic, but a headset is much more mobile and the sound quality is decent.
  • Pop filter to remove those annoying mouth sounds and popping p’s.
  • Mic stand. I use a boom mic mounted to my desk. I like to swing it in and out of position. The Blue Compass is a nice-looking boom if you don’t want to make your own or break the bank.
  • Teleprompter (better than reading from a paper script). A lot of people use a second monitor or tablet.
  • Sound buffer to control ambient noise and get fuller sound quality.

How to Record Audio Narration

I won’t go into a lot of detail about recording because there are a lot of different applications. But I will narrow it down to a few basic tips.

  • Record in the authoring tool or outside? You can always record much of the audio narration with the e-learning software. That makes it super easy, especially if you’re doing all the work by yourself. Storyline 360 even has a simple audio editor for some post-production editing. However, I prefer to separate my multimedia production into distinct groups: video, audio, graphics, and course construction. I find it helps keep me focused on one thing and I can get it done right the first time. Because of this, I like to record my narration outside of the authoring tools. Then I can make any edits I need and upload the narration into the software. This works in both Storyline 360 and Rise 360.
  • Free audio editors. If you don’t have any money, Audacity is a free audio application that works fine for recording narration. Here’s a list of a few other free audio recording options. Levelator (although no longer supported) does a respectable job cleaning up your audio narration. There are also all sorts of apps you can use on your phones and tablets to record audio (iOS and Android).
  • How to save audio files. You can save as .MP3 or .WAV. Both should be fine. MP3 files will be much smaller and you won’t notice any degradation. It’s also a good idea to have a consistent naming strategy when you save your files. “Audio1.mp3” isn’t very good. However, “Safety101-Intro-Layer4.mp3” makes a lot more sense and you know where it goes in the course when you have to import it.

These are some good, basic getting started tips when recording audio narration. If you have some to share, feel free to add them to the comments.

Events

Free E-Learning Resources

Want to learn more? Check out these articles and free resources in the community.

Here’s a great job board for e-learning, instructional design, and training jobs

Participate in the weekly e-learning challenges to sharpen your skills

Get your free PowerPoint templates and free graphics & stock images.

Lots of cool e-learning examples to check out and find inspiration.

Getting Started? This e-learning 101 series and the free e-books will help.


closed aptions for e-learning

A guest post by Elizabeth Pawlicki, Training Program Manager, Articulate.

If you’re a Google Chrome 89+ user you now have access to Live Caption which is an accessibility feature that provides real-time captions for audio that plays through the browser.

This is a really excellent feature for audio that runs through your browser when viewing courses that have videos or narration, especially if the audio doesn’t have captions. Check it out below.

Initial Thoughts on Google Live Caption

I tested the Live Captions on a few different e-learning products that had audio including courses in Storyline 360, Rise 360, and Review 360. The captions worked well, surprisingly well, as you can see in the image below.

Google Live Caption demo closed captions

I also like that even if you turn off the audio, the captions work. As a user I am no longer constrained by whether or not the audio I am consuming has closed captions built-in to the product. The browser does the heavy lifting.

This is a big step forward for those who require captioned audio. I look forward to how this feature evolves going forward.

How to Access Google Live Caption

Google Live Caption closed captions

  • First, make sure you’re using Google Chrome 89 or higher.
  • Click the three dots on the top right.
  • Then go to Settings and select Advanced>Accessibility.
  • Click the toggle for Live Caption.

Once you have enabled Live Caption, you’ll see an option to toggle the captions on and off without going in and out of the settings.

Google Live Caption closed captions toggle

Key Considerations for Google Live Caption

  • This tip requires Google Chrome 89 or above. If you have learners who need captions and you can’t provide them in time, you at least have the option to recommend Chrome 89.
  • It’s a new feature so there are some limitations such as size, position, and language. However, I assume the feature will be enhanced and my guess is other browsers will play catch up.
  • From what I can tell the caption choices in Windows OS don’t seem to impact the captions displayed in the browser.

Google Live Caption is a step in the right direction and a great tool for those who need captions when they’re not provided.


Events

Free E-Learning Resources

Want to learn more? Check out these articles and free resources in the community.

Here’s a great job board for e-learning, instructional design, and training jobs

Participate in the weekly e-learning challenges to sharpen your skills

Get your free PowerPoint templates and free graphics & stock images.

Lots of cool e-learning examples to check out and find inspiration.

Getting Started? This e-learning 101 series and the free e-books will help.


test e-learning templates

Articulate 360’s Content Library comes with thousands of e-learning templates. Each template is made up of theme fonts and theme colors. Theme fonts and colors are an easy way to manage and update course files.

Here’s a common issue and easy solution when troubleshooting e-learning courses. Instead of using theme colors many developers do quick color picks or custom colors. This is fine until you need to make a change to the slide and the colors aren’t updating when you change the theme color.

Our template developers have a simple technique to check the theme colors and make sure that they’re used throughout the various template slides.

test theme colors e-learning template

Here are the steps:

  • Create a new color theme.
  • Make every color bright yellow.
  • Save the theme colors.
  • When you apply this theme, everything on the slide should use those colors.

Whenever you need to test a template to ensure it’s using the theme, apply that test theme color. Everything on the slide should be bright yellow. Whatever isn’t, is not using a theme color. That makes it easy to fix issues on the slides.

e-learning template theme color

The example above, when I apply the yellow test theme, all of the objects change except the purple circle because that’s not using a theme color.

Simple tip. Easy to do. And a big timesaver if you use theme colors, which you should.

Events

Free E-Learning Resources

Want to learn more? Check out these articles and free resources in the community.

Here’s a great job board for e-learning, instructional design, and training jobs

Participate in the weekly e-learning challenges to sharpen your skills

Get your free PowerPoint templates and free graphics & stock images.

Lots of cool e-learning examples to check out and find inspiration.

Getting Started? This e-learning 101 series and the free e-books will help.


how to theme colors

When someone first starts to build an e-learning course, one of the first things I recommend is determining the colors they’ll use. And from there, create a template and assign the theme colors.

The benefits to theme colors is that they allow consistent use of colors throughout the course; and if one needs to change, it can be changed once, and that change is applied wherever the color is used.

The next recommendation is to determine how to use theme colors. This is often confusing because, you get six theme colors and five derivatives per color. However, there’s no rhyme or reason in terms of how they should be used. They’re just six boxes that can be filled with colors. You can use those boxes anyway you like.

theme colors

But that’s not how you should use them.

I recommend that you define a theme color structure and then use them consistently. This way, every time you build a course the theme colors are set up the same and you can easily swap them out when needed.

How to Set Up Theme Colors

Here are a few ideas that may work:

  • You get six theme colors. But you don’t really need to use all six.
  • Define how you do want to use the colors, whether it’s six or four or two.

theme colors

  • Use theme colors consistently in all templates you create.
  • Courses usually have a main color and an accent color. If you only used two colors, you’d have twelve to use because of the iterations. That may be all you need.
  • Most courses have some positive and negative feedback color, usually green and red. Use two of the theme colors for positive and negative feedback.

Here is one way you could define your theme colors:

theme color recommendation

  • Accent 1: base color. Usually this is your core brand color.
  • Accent 2: accent color. Most brands have an accent color. If you don’t have one, you can use a color theme site to create one. I typically will select a complementary color of the base color.
  • Accent 3: open. Why create a color you don’t need?
  • Accent 4: open.
  • Accent 5: positive color. Green pulled from the base color’s palette. Use this for quiz feedback or icons to show a good decision.
  • Accent 6: negative color. Red pulled from the base color’s palette. Use this for quiz feedback or icons to show a wrong decision.

For the two open colors, I may look through my organization’s web site and marketing collateral and see if there are other secondary colors used that I could add to the palette. Most of the times, two colors are all I need.

If every course is built with consistent use of theme colors, they can be swapped in seconds. This is a critical part of building and re-using interactions and templates. It’s a little more work upfront (which should be done anyway). But in the long-term it offers some time-saving benefits.

Do you have a strategy when using theme colors?

Events

Free E-Learning Resources

Want to learn more? Check out these articles and free resources in the community.

Here’s a great job board for e-learning, instructional design, and training jobs

Participate in the weekly e-learning challenges to sharpen your skills

Get your free PowerPoint templates and free graphics & stock images.

Lots of cool e-learning examples to check out and find inspiration.

Getting Started? This e-learning 101 series and the free e-books will help.


3 ways to use theme colors for e-learning

One way to speed up production in your e-learning course design is to use themed slides. You can create robust and visually varied templates like the ones you get in Content Library. The templates are a combination of layouts and two themed elements: fonts and colors. However, you don’t need to have a complex template to leverage theme colors.

Theme colors allow you to pre-determine the colors you’ll use in your course’s slides. There are several benefits and reasons when using theme colors.

Make Easy Updates to Theme Colors for E-Learning

Here’s a common scenario: insert an image and then do a color pick of the image to pull a color to use for outlines or shapes in the course. Later someone suggest changing the color. The challenge is going through every slide and making changes where that color was used.

Use theme colors to quickly modify all the objects with that same theme color. This doesn’t require a lot of consistency in terms of how you use the colors. It just means that if you do a color pick, for example, you add that to one of the accent colors so you can apply that accent color through the course.

If you have red shapes and they need to be blue, if you used a theme color to fill the shape all you need to do is change the theme color.

theme colors for e-learning templates

Create a Loaded Palette of Theme Colors for E-Learning

You get six accent colors, and each has five derivatives. You don’t need to have a real strategy when using theme colors. You get six slots. Figure out what six colors you need in your course and then create a palette, so you always have those six available to you.

You can use the colors willy nilly with no consideration to any real structure. The key advantage is having a palette of desired colors on hand.

theme colors for e-learning templates to have a palette

Develop a Strategy for Theme Colors for E-Learning

Assuming you build a lot of templates and you re-use them, then it makes sense to be strategic about how you use the theme colors. You get six slots. Use them the same way every time you create a theme color. That makes it easy to create a new theme and re-use templates because you know that the theme colors are applied the same way to the same objects.

Determine how you want to use the color slots and then use them that way consistently. This allows you to quickly apply new color themes knowing that the entire template will change, and the colors will make universal changes to the entire course.

theme colors for e-learning templates for universal changes

Some people are very strategic an organized in how they use theme colors. And some just use them with no sense of structure. They just want a place to load some colors and have quick access. That’s fine, too.

What you want to avoid is using single colors outside the theme that can’t easily or quickly be updated later. Theme colors help prevent that and save time when building courses whether your strategic or just using a palette.

Events

Free E-Learning Resources

Want to learn more? Check out these articles and free resources in the community.

Here’s a great job board for e-learning, instructional design, and training jobs

Participate in the weekly e-learning challenges to sharpen your skills

Get your free PowerPoint templates and free graphics & stock images.

Lots of cool e-learning examples to check out and find inspiration.

Getting Started? This e-learning 101 series and the free e-books will help.


convert Storyline PowerPoint

It never fails that after building an e-learning course in Storyline, someone asks if they can get a PowerPoint version of the course. There are many reasons for this request, such as using the content for face-to-face training, wanting a slide deck for subject matter experts, or creating a PDF handout out of the slides.

Today, we’ll look at a simple way to convert what you created in Storyline and make it a PowerPoint file.

PowerPoint and Storyline are Different Applications

Before we get started, let’s review a few key points when working with PowerPoint and Storyline.

  • PowerPoint and Storyline may look similar, but they are two different applications made by two different companies so they’re not interchangeable files.
  • PowerPoint is designed mostly for linear presentations. Storyline is designed for interactive e-learning.
  • PowerPoint has some interactive features and things one can do to hack a certain level of interactivity, but it doesn’t have a lot of sophistication with things such as mouseovers, drag/drops, variables, etc. Thus going from Storyline to PowerPoint is a bit challenging if the original Storyline content is interactive.
  • Storyline has an import PowerPoint feature to convert the PowerPoint slides to Storyline slides. PowerPoint doesn’t have an import Storyline feature.

The above seems obvious, but I bring this up because many people start with PowerPoint content, import it into Storyline, and then later want to export the Storyline content back into PowerPoint as if they are interchangeable applications and file types. They aren’t.

While there is no feature in PowerPoint to import Storyline, there are some simple things you can do to get your Storyline content into a PowerPoint file.

Tip #1: Start All Course Development in PowerPoint

My first tip assumes you know that you’ll need a PowerPoint version of the course.

If you know you need your content to be in both PowerPoint and Storyline, then plan your projects accordingly. PowerPoint doesn’t support all of the interactive features of Storyline, but in terms of what’s visible on the screen, it’s mostly the same: text, shapes, pictures, etc. With some planning, you can have your course content in both formats.

Here’s what I’d do:

  • Build all your content in PowerPoint first (with forethought as to what you want to be interactive and specific to Storyline).
  • Get final sign-off on the PowerPoint content since the content should be the same. The Storyline specific content is most likely more interactive.
  • Import the approved content into Storyline.
  • Make your interactive edits.
  • Publish your Storyline course.

Using this approach, you end up with a PowerPoint file and interactive Storyline file. If you need to make edits, it should be for interactive features only since you got sign-off on the content while it was in PowerPoint.

Of course, this approach does requires that you plan it all up front, which doesn’t always happen (or the client makes last minute changes). I’d tell the client upfront that this is the production process and that edits after sign-off are outside the scope of the project.

Tip #2: Publish to Word & Extract Screenshots

Let’s suppose you already built a course in Storyline and now you need a PowerPoint version of the course. Like I mentioned above, PowerPoint can’t support the layers and interactions, however, most of what’s in the course is a screen with content that’s made up of text, pictures, and shapes.

The following tip lets you capture all of the content that displays onscreen. It is not going to capture your state changes and other interactivity. But it works for most cases and captures all of the slides and layers.

Click here to view the tutorial on YouTube.

Below are the basic steps, but watch the tutorial above for more detail:

  • Once the course is complete, publish the Storyline course in Word. Select to publish layers and large images. This creates a Word doc with all of the slides and layers exposed.
  • By default, Storyline saves to an older version of Word with the .doc extension. This is so people with older versions can open the file.
  • Open the Word .doc and save as .docx. This will allow you to unzip the file and extract the images.
  • Unzip the .docx file to extract the images. I use 7zip (a free application).
  • Insert the images into a new PowerPoint album.
  • Save the file and you’re all done.

The output using this method is a series of PowerPoint slides with each Storyline slide and layer captured. From there you can make simple edits or save as a PowerPoint or PDF file. In any case, you have your Storyline content in PowerPoint format.

Events

Free E-Learning Resources

Want to learn more? Check out these articles and free resources in the community.

Here’s a great job board for e-learning, instructional design, and training jobs

Participate in the weekly e-learning challenges to sharpen your skills

Get your free PowerPoint templates and free graphics & stock images.

Lots of cool e-learning examples to check out and find inspiration.

Getting Started? This e-learning 101 series and the free e-books will help.


subject matter expert e-learning course

You’re building an e-learning course and your subject matter expert needs to review and make edits to the course. But they don’t have access to your e-learning software.

So how do you get them to make those edits? Here are some time-saving tips.

What Should Happen

Before you start building the e-learning course, you should have a signed and approved script. And then you work from that. Obviously, there will be a final review and there’s always some editing to be done. But there shouldn’t be a ton, or not enough that requires someone else make significant edits.

Of course, that’s not how it always works.

I’ve been on projects where it seems things are done and then marketing steps in and throws a wrench in the process. So you end up making a bunch of edits to fit the organization’s brand.

Another common issue is when training that involves the legal team. I have nothing against lawyers, but I swear, they can really create a lot of extra work, especially with compliance training where every word means something.

To combat this issue, you should bring all those teams to the table when you develop the content and prior to sign-off before you start assembling the course.

That’s how it should work in an ideal world: the project and content is reviewed and you get final sign-off.  But that’s just not how it ends up working for a lot of people.

How to Get the Subject Matter Expert to Make the Edits

Storyline has a feature to export the course text for translation. It gets exported to a Word doc. From there, someone can review and make text edits. When done, the Word doc is saved and imported back into Storyline. Why not use that feature for your subject matter experts?

Here’s what I’d do:

  • Publish the course to Review 360. They can see the course in action. Of course, they can add comments, but you don’t need them since they’ll be making edits in the doc.

subject matter expert reviews edits course

  • Export the course for translation.
  • Forward the Word doc to the subject matter expert with instructions on what to do.
  • The subject matter expert reviews the course and makes text edits in the Word doc.
  • The subject matter expert forwards the Word doc.
  • Import the edited doc into Storyline.


Watch the tutorial on YouTube.

That’s a pretty easy process. It allows your subject matter expert to review a published course. And where they want to make changes, they do so in the Word doc. Super easy and it doesn’t require that they have access to your e-learning application.

Events

Free E-Learning Resources

Want to learn more? Check out these articles and free resources in the community.

Here’s a great job board for e-learning, instructional design, and training jobs

Participate in the weekly e-learning challenges to sharpen your skills

Get your free PowerPoint templates and free graphics & stock images.

Lots of cool e-learning examples to check out and find inspiration.

Getting Started? This e-learning 101 series and the free e-books will help.


manage multimedia

When I’ve completed PowerPoint presentations or e-learning courses, I like to save all of the media assets I used in the presentations and courses and put them in a single location. During production I have multiple versions of the files, which is fine. But when it’s all over, I like a single place for all the media assets. It makes it easy to locate and not have to dig through all of the versions and duplicate files.

In today’s post, I’m going to show you a few simple tips to manage the media assetsin your PowerPoint presentations and e-learning courses.

It does require a couple of free tools which you can download here:

Use Storyline’s Media Library to Locate and Export Media Assets

If you’re using Storyline 360, the easiest way to locate your assets is via the Media Library. From there, you can select the ones you want and export them. Media Library filters by images, characters, audio, and video.

manage media assets e-learning media library Storyline

Steps to export the media:

  • Open the Media Library under the View tab.
  • Filter media by type.
  • Select the media files.
  • Select export and the media files will be saved to a folder of your choosing.

Here’s a quick tutorial on exporting the media files from your Storyline projects using the Media Library.

Click here to watch the tutorial on YouTube.

Use 7-ZIP to Extract the Media Files from PowerPoint & Storyline

7-Zip is a free application to compress and extract files. Both PowerPoint (.pptx) and Storyline (.story) use compressed file formats. Use 7-Zip to extract the file, locate the media in it, and then copy the media to a temporary folder.

manage media assets e-learning PowerPoint 7-zip

Steps to extract the media from PowerPoint or Storyline files:

  • Locate your file.
  • Right-click and select extract.
  • This creates a new folder with the file name.
  • Locate the media folder inside the extracted file folder. In PowerPoint it’s in the “ppt” folder and in Storyline it is in the “story” folder).
  • Copy and paste the folder to your archive location.

Here’s a quick tutorial that shows how to use 7-Zip to locate the media files in both PowerPoint presentations and Storyline files.

Click here it view the tutorial on YouTube.

Use Microsoft PowerToys to Rename All of Your Files to a Single Project Name

Recently, I shared how to use PowerToys to preview SVG files. Today, we’ll review how to quickly rename all of those media files you just dug out of PowerPoint or Storyline.

The steps are pretty simple:

  • Locate the folder with the assets.
  • Select the files you want to rename.
  • Right-click and select “PowerRename” and rename the files.

manage media assets e-learning PowerPoint Microsoft PowerToys Rename

If the titles are something like image1 and you want to rename all instances of “image” to Safety101, that’s going to be real easy. However, the PowerToys renaming is pretty powerful and with a few simple variables, you can do all sorts of things.

Check out the tutorial below where I go through the basics of renaming and how to change the name when all of the text is a bunch of gibberish or not easily found and replaced (which is probably more common).

Click here to watch the tutorial on YouTube.

I’ll admit, I am not always consistent with how I manage my media assets. Sometimes I keep them in a big media folder and sometimes I keep them in project-specific folder. Ultimately it doesn’t matter. When everything is done, I can follow the tips above and quickly have all of my media assets in one folder that I can share or archive.


Events

Free E-Learning Resources

Want to learn more? Check out these articles and free resources in the community.

Here’s a great job board for e-learning, instructional design, and training jobs

Participate in the weekly e-learning challenges to sharpen your skills

Get your free PowerPoint templates and free graphics & stock images.

Lots of cool e-learning examples to check out and find inspiration.

Getting Started? This e-learning 101 series and the free e-books will help.