The Rapid Elearning Blog

Archive for the ‘Tutorials’ Category


convert Storyline PowerPoint

It never fails that after building an e-learning course in Storyline, someone asks if they can get a PowerPoint version of the course. There are many reasons for this request, such as using the content for face-to-face training, wanting a slide deck for subject matter experts, or creating a PDF handout out of the slides.

Today, we’ll look at a simple way to convert what you created in Storyline and make it a PowerPoint file.

PowerPoint and Storyline are Different Applications

Before we get started, let’s review a few key points when working with PowerPoint and Storyline.

  • PowerPoint and Storyline may look similar, but they are two different applications made by two different companies so they’re not interchangeable files.
  • PowerPoint is designed mostly for linear presentations. Storyline is designed for interactive e-learning.
  • PowerPoint has some interactive features and things one can do to hack a certain level of interactivity, but it doesn’t have a lot of sophistication with things such as mouseovers, drag/drops, variables, etc. Thus going from Storyline to PowerPoint is a bit challenging if the original Storyline content is interactive.
  • Storyline has an import PowerPoint feature to convert the PowerPoint slides to Storyline slides. PowerPoint doesn’t have an import Storyline feature.

The above seems obvious, but I bring this up because many people start with PowerPoint content, import it into Storyline, and then later want to export the Storyline content back into PowerPoint as if they are interchangeable applications and file types. They aren’t.

While there is no feature in PowerPoint to import Storyline, there are some simple things you can do to get your Storyline content into a PowerPoint file.

Tip #1: Start All Course Development in PowerPoint

My first tip assumes you know that you’ll need a PowerPoint version of the course.

If you know you need your content to be in both PowerPoint and Storyline, then plan your projects accordingly. PowerPoint doesn’t support all of the interactive features of Storyline, but in terms of what’s visible on the screen, it’s mostly the same: text, shapes, pictures, etc. With some planning, you can have your course content in both formats.

Here’s what I’d do:

  • Build all your content in PowerPoint first (with forethought as to what you want to be interactive and specific to Storyline).
  • Get final sign-off on the PowerPoint content since the content should be the same. The Storyline specific content is most likely more interactive.
  • Import the approved content into Storyline.
  • Make your interactive edits.
  • Publish your Storyline course.

Using this approach, you end up with a PowerPoint file and interactive Storyline file. If you need to make edits, it should be for interactive features only since you got sign-off on the content while it was in PowerPoint.

Of course, this approach does requires that you plan it all up front, which doesn’t always happen (or the client makes last minute changes). I’d tell the client upfront that this is the production process and that edits after sign-off are outside the scope of the project.

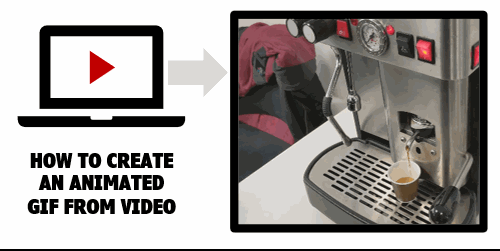
Tip #2: Publish to Word & Extract Screenshots

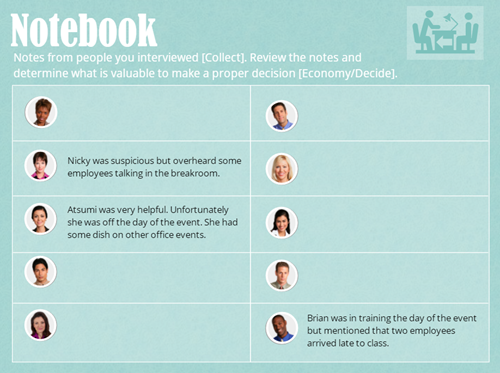
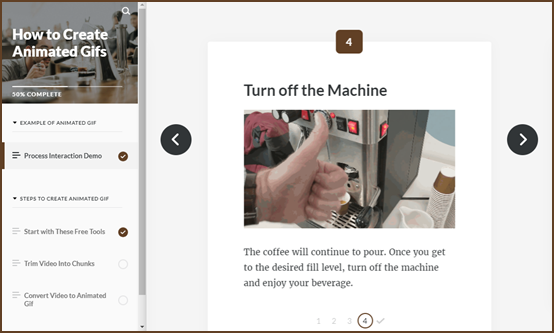
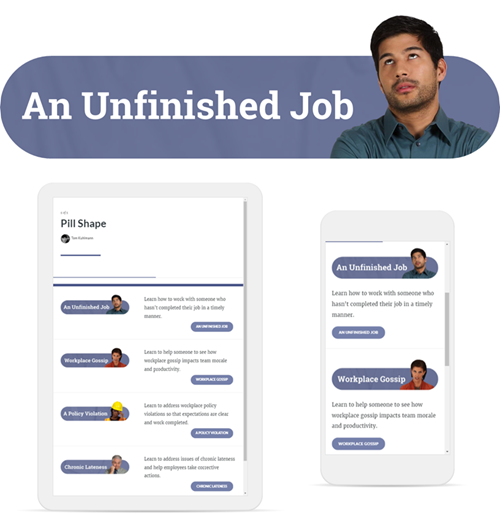
Let’s suppose you already built a course in Storyline and now you need a PowerPoint version of the course. Like I mentioned above, PowerPoint can’t support the layers and interactions, however, most of what’s in the course is a screen with content that’s made up of text, pictures, and shapes.

The following tip lets you capture all of the content that displays onscreen. It is not going to capture your state changes and other interactivity. But it works for most cases and captures all of the slides and layers.

Click here to view the tutorial on YouTube.

Below are the basic steps, but watch the tutorial above for more detail:

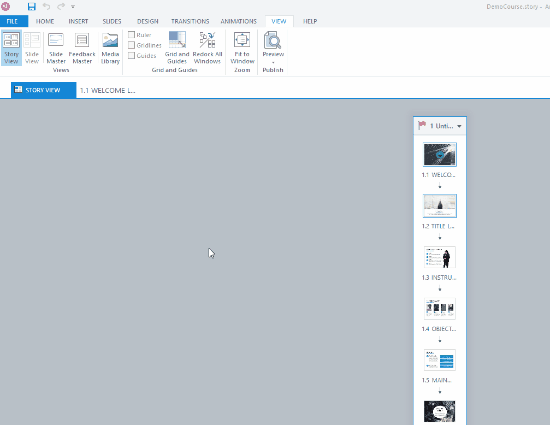
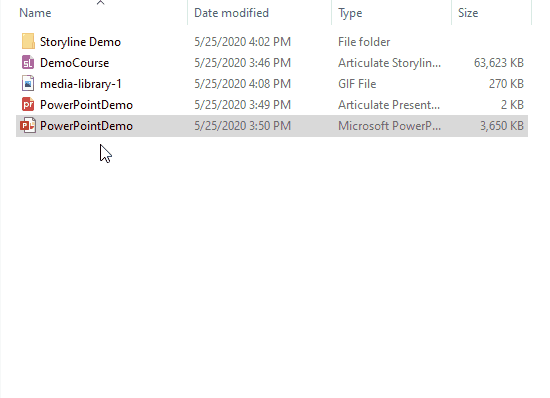
  • Once the course is complete, publish the Storyline course in Word. Select to publish layers and large images. This creates a Word doc with all of the slides and layers exposed.
  • By default, Storyline saves to an older version of Word with the .doc extension. This is so people with older versions can open the file.
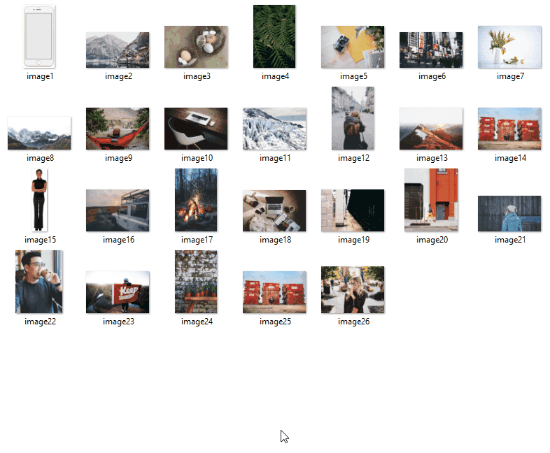
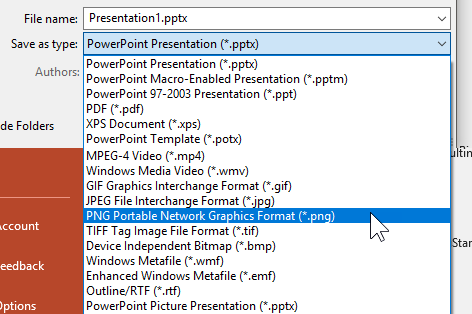
  • Open the Word .doc and save as .docx. This will allow you to unzip the file and extract the images.
  • Unzip the .docx file to extract the images. I use 7zip (a free application).
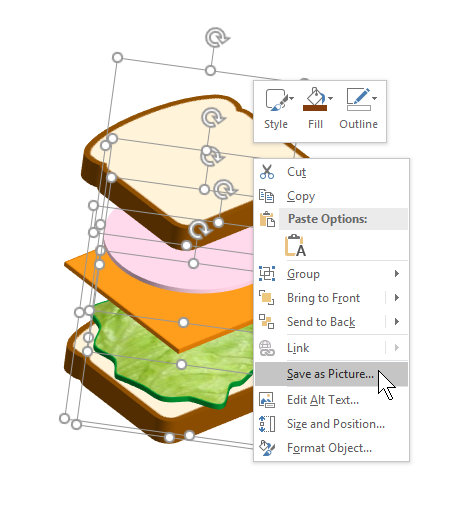
  • Insert the images into a new PowerPoint album.
  • Save the file and you’re all done.

The output using this method is a series of PowerPoint slides with each Storyline slide and layer captured. From there you can make simple edits or save as a PowerPoint or PDF file. In any case, you have your Storyline content in PowerPoint format.

Events

Free E-Learning Resources

Want to learn more? Check out these articles and free resources in the community.

Here’s a great job board for e-learning, instructional design, and training jobs

Participate in the weekly e-learning challenges to sharpen your skills

Get your free PowerPoint templates and free graphics & stock images.

Lots of cool e-learning examples to check out and find inspiration.

Getting Started? This e-learning 101 series and the free e-books will help.


subject matter expert e-learning course

You’re building an e-learning course and your subject matter expert needs to review and make edits to the course. But they don’t have access to your e-learning software.

So how do you get them to make those edits? Here are some time-saving tips.

What Should Happen

Before you start building the e-learning course, you should have a signed and approved script. And then you work from that. Obviously, there will be a final review and there’s always some editing to be done. But there shouldn’t be a ton, or not enough that requires someone else make significant edits.

Of course, that’s not how it always works.

I’ve been on projects where it seems things are done and then marketing steps in and throws a wrench in the process. So you end up making a bunch of edits to fit the organization’s brand.

Another common issue is when training that involves the legal team. I have nothing against lawyers, but I swear, they can really create a lot of extra work, especially with compliance training where every word means something.

To combat this issue, you should bring all those teams to the table when you develop the content and prior to sign-off before you start assembling the course.

That’s how it should work in an ideal world: the project and content is reviewed and you get final sign-off.  But that’s just not how it ends up working for a lot of people.

How to Get the Subject Matter Expert to Make the Edits

Storyline has a feature to export the course text for translation. It gets exported to a Word doc. From there, someone can review and make text edits. When done, the Word doc is saved and imported back into Storyline. Why not use that feature for your subject matter experts?

Here’s what I’d do:

  • Publish the course to Review 360. They can see the course in action. Of course, they can add comments, but you don’t need them since they’ll be making edits in the doc.

subject matter expert reviews edits course

  • Export the course for translation.
  • Forward the Word doc to the subject matter expert with instructions on what to do.
  • The subject matter expert reviews the course and makes text edits in the Word doc.
  • The subject matter expert forwards the Word doc.
  • Import the edited doc into Storyline.


Watch the tutorial on YouTube.

That’s a pretty easy process. It allows your subject matter expert to review a published course. And where they want to make changes, they do so in the Word doc. Super easy and it doesn’t require that they have access to your e-learning application.

Events

Free E-Learning Resources

Want to learn more? Check out these articles and free resources in the community.

Here’s a great job board for e-learning, instructional design, and training jobs

Participate in the weekly e-learning challenges to sharpen your skills

Get your free PowerPoint templates and free graphics & stock images.

Lots of cool e-learning examples to check out and find inspiration.

Getting Started? This e-learning 101 series and the free e-books will help.


manage multimedia

When I’ve completed PowerPoint presentations or e-learning courses, I like to save all of the media assets I used in the presentations and courses and put them in a single location. During production I have multiple versions of the files, which is fine. But when it’s all over, I like a single place for all the media assets. It makes it easy to locate and not have to dig through all of the versions and duplicate files.

In today’s post, I’m going to show you a few simple tips to manage the media assetsin your PowerPoint presentations and e-learning courses.

It does require a couple of free tools which you can download here:

Use Storyline’s Media Library to Locate and Export Media Assets

If you’re using Storyline 360, the easiest way to locate your assets is via the Media Library. From there, you can select the ones you want and export them. Media Library filters by images, characters, audio, and video.

manage media assets e-learning media library Storyline

Steps to export the media:

  • Open the Media Library under the View tab.
  • Filter media by type.
  • Select the media files.
  • Select export and the media files will be saved to a folder of your choosing.

Here’s a quick tutorial on exporting the media files from your Storyline projects using the Media Library.

Click here to watch the tutorial on YouTube.

Use 7-ZIP to Extract the Media Files from PowerPoint & Storyline

7-Zip is a free application to compress and extract files. Both PowerPoint (.pptx) and Storyline (.story) use compressed file formats. Use 7-Zip to extract the file, locate the media in it, and then copy the media to a temporary folder.

manage media assets e-learning PowerPoint 7-zip

Steps to extract the media from PowerPoint or Storyline files:

  • Locate your file.
  • Right-click and select extract.
  • This creates a new folder with the file name.
  • Locate the media folder inside the extracted file folder. In PowerPoint it’s in the “ppt” folder and in Storyline it is in the “story” folder).
  • Copy and paste the folder to your archive location.

Here’s a quick tutorial that shows how to use 7-Zip to locate the media files in both PowerPoint presentations and Storyline files.

Click here it view the tutorial on YouTube.

Use Microsoft PowerToys to Rename All of Your Files to a Single Project Name

Recently, I shared how to use PowerToys to preview SVG files. Today, we’ll review how to quickly rename all of those media files you just dug out of PowerPoint or Storyline.

The steps are pretty simple:

  • Locate the folder with the assets.
  • Select the files you want to rename.
  • Right-click and select “PowerRename” and rename the files.

manage media assets e-learning PowerPoint Microsoft PowerToys Rename

If the titles are something like image1 and you want to rename all instances of “image” to Safety101, that’s going to be real easy. However, the PowerToys renaming is pretty powerful and with a few simple variables, you can do all sorts of things.

Check out the tutorial below where I go through the basics of renaming and how to change the name when all of the text is a bunch of gibberish or not easily found and replaced (which is probably more common).

Click here to watch the tutorial on YouTube.

I’ll admit, I am not always consistent with how I manage my media assets. Sometimes I keep them in a big media folder and sometimes I keep them in project-specific folder. Ultimately it doesn’t matter. When everything is done, I can follow the tips above and quickly have all of my media assets in one folder that I can share or archive.


Events

Free E-Learning Resources

Want to learn more? Check out these articles and free resources in the community.

Here’s a great job board for e-learning, instructional design, and training jobs

Participate in the weekly e-learning challenges to sharpen your skills

Get your free PowerPoint templates and free graphics & stock images.

Lots of cool e-learning examples to check out and find inspiration.

Getting Started? This e-learning 101 series and the free e-books will help.


animated gifs

Recently I shared some free animated gif resources: animated icons and backgrounds. If you’re using Rise or Rise.com it’s as simple as inserting an image. They’re great for novel attention-getters or simple instructional procedures.

free animated gif interaction

If you’re using Storyline 360, with triggers and state changes you can do a bit more to control how the animated gifs work in your course.

Animated gifs are great, but they do loop. Thus, when you insert them in the slide they just continue without end.

To make it more interactive, I like to insert a static image and then interact with the image to activate the animated gif.

animated gif

Click to view the example.

The demo above shows a few ideas:

  • Selected state is like an on/off toggle. Press on the image to toggle between the static version and animated gif.
  • Hover state allows you to mouse over the static image to reveal the animated gif and mouse away when you want to leave.
  • Down state is like the mouseover, but works by pressing down on the image to activate the gif, and releasing the mouse, stops it. I like this option the best.

Bonus idea: do the opposite and start with the looping animation and create an interaction where the animation stops when clicked.

  • Visited state indicates when an object has been clicked. Use the animated icons as markers and then insert the static image in the visited state. This provides a nice visual indication of what’s already been viewed.

View the tutorial on YouTube.

What’s cool about all of the choices above is that they’re super easy to build and don’t require any triggers. Sometimes the looping can be a bit distracting to start, so having an interactive option is nice. I like them because instead of a looping animation it allows the image to become interactive where the user can click to view it and activate the animation.

Events

Free E-Learning Resources

Want to learn more? Check out these articles and free resources in the community.

Here’s a great job board for e-learning, instructional design, and training jobs

Participate in the weekly e-learning challenges to sharpen your skills

Get your free PowerPoint templates and free graphics & stock images.

Lots of cool e-learning examples to check out and find inspiration.

Getting Started? This e-learning 101 series and the free e-books will help.


closed captions and live transcripts

I present at a lot of conferences and workshops. I’ve always thought about having captions during the live presentations. They come in handy for the person who can’t hear and needs them. And they potentially add value for the person who can’t quite hear everything: maybe the room is disruptive or the speaker talks too fast. Or perhaps, English isn’t the first language and hearing and processing is a little slower.

In either case, having a transcript in real time is valuable. Here are a couple of options to have transcriptions of your live presentations using tools you already have.

Live Transcriptions & Closed Captions in Google Slide Presentations

Here’s an example of live transcription and closed captions in Google Slides. I even show how you could use it doing a software demo in a live presentation. I find the transcription on Google Slides is a lot faster and a bit more accurate than in PowerPoint.

Click here to view the tutorial on YouTube.

Live Transcription & Closed Captions in PowerPoint Presentations

Here’s an example of live transcription and closed captions (or subtitles) in PowerPoint. The transcription is really fast and it dynamically adjusts to be more contextual. You can also translate the transcript in real time. It’s almost magical.

Click here to view the tutorial on YouTube.

It’s probably not practical to do a live transcription for a software workshop. I think the transcription may confuse things because of the naming of features and procedural steps. But for regular presentations it seems to work really well.

I recommend putting the captions on top and make them as large as possible. This allows people in the back of the room to see them better. If they’re on the bottom they may not be visible.

Anyone use these features for your live presentations? If so, any extra tips?

Events

Free E-Learning Resources

Want to learn more? Check out these articles and free resources in the community.

Here’s a great job board for e-learning, instructional design, and training jobs

Participate in the weekly e-learning challenges to sharpen your skills

Get your free PowerPoint templates and free graphics & stock images.

Lots of cool e-learning examples to check out and find inspiration.

Getting Started? This e-learning 101 series and the free e-books will help.


low recording levels

If you find that you’re microphone audio levels are too low, here are some tips that may help.

I record a lot of demos and webinars. With that comes the quest to find decent quality audio. I have a boom arm on my desk that I can swing into action. On it I have a Blue Yeti microphone. Overall, I really like the quality of the sound and this set up works great for recording tutorials where I work from my main screen. I also like that the microphone has its own gain controls which resolves the issue I have below.

However, the challenge with the Blue Yeti is that I work from a home office and if people outside my office are yacking, then the mic picks up their chatter. I can usually work around it a bit. However, webinars are live and I have less real-time control.

For webinars I prefer to use a headset mic because they seem to do a better job blocking out background noise. I’ve used a Plantronics mic for years. It does a great job recording my voice and blocking out the other home office sound. However, the audio is a bit thin and sounds like I’m Lionel Richie on a phone, checking to see who’s home.

Because of this, I recently purchased a Beyerdynamic headset mic. It’s a bit higher end but it’s a great mic with a nice sound. However, it is an XLR mic which requires a different connection to my computer and a pre-amplifier.

And this is where the Windows 10 audio issue is exposed and fixed.

Where’s the Microphone Boost?

Like many Windows 10 users, the audio recording input signal is too low. Earlier versions of Windows had a way to boost the recording input, as seen in the image below. However, in recent versions, there’s no option.

audio recording input low

If you do not have the option to boost your audio input, one potential fix is to select the Advanced tab from the Microphone Properties window and deselect the option to “Allow application to take executive control of this device.” This works for some people.

The other option is to use a pre-amp. I have an older Focusrite Scarlett 2i2 which is generally simple to use and should work. However, I ran into an issue. The pre-amp has an input range of 1 to 10, but it only seemed to have an impact from about 8 to 10. I just wasn’t getting enough initial boost and the 8 to 10 range didn’t give me enough wiggle room. Since it’s a USB pre-amp, I figured that perhaps it just didn’t have enough juice for the phantom power and signal boost since it was pulling its power from the computer.

Focusrite Clarett pre-amp

So I tested the Focusrite Clarett. It has its own power source and not pulling it from the computer via USB. However, I ran into the same issues. The range was limited to 8 to 10 with little room for adjustments. Both Focusrite devices are good devices and should work. In fact, on older versions of Windows, the Scarlett worked perfectly. However, with the latest version of Windows 10, I just can’t seem to boost the input levels and there no longer seems to be a way to do it from the drivers or the audio control panel.

So where’s the fix?

Install APO Equalizer. It’s an open source project on Source Forge that includes a pre-amp which will boost your incoming microphone signal. In addition, there are some other audio options to enhance your audio input and outputs.

APO eaulizer for low audio recording volume

I’m no audio engineer or APO Equalizer pro. However, the installation is easy, and the setup is pretty simple. Don’t let all of the meters and lines make it seem complicated. Once it’s set, you really shouldn’t have to do much with it. Below are some resources to help you get set-up.

The YouTube tutorial above does a great job showing the basics. It’s probably worth learning a little more about some of the filters and how they can improve your audio input. In fact, many of us record in less than ideal circumstances where we may have background noises like air conditioners or computer fans. Some of those filters may help fix the issues.

If you have issues with low recording volumes, hopefully these tips help. If you have additional tips, feel free to share them in the comments section.

Events

Free E-Learning Resources

Want to learn more? Check out these articles and free resources in the community.

Here’s a great job board for e-learning, instructional design, and training jobs

Participate in the weekly e-learning challenges to sharpen your skills

Get your free PowerPoint templates and free graphics & stock images.

Lots of cool e-learning examples to check out and find inspiration.

Getting Started? This e-learning 101 series and the free e-books will help.


edit EPS and SVG

There are a lot of free graphics files available online. Many of the free graphics are illustrations that are .EPS or .SVG files. The challenge is editing those files to suit your own needs.

If you already own a graphics program, then you can edit the files with no problems. If you don’t, then you have to look for other options.

Photopea is a free app where you can edit graphics files online. It’s fairly easy-to-use and includes a standard graphic’s editing user interface. I’ve included two quick tutorials to feature a few of thing things I like about the free application.

How to Edit EPS & SVG for Free

Click here to view the tutorial on YouTube.

Here’s how to upload and edit a .EPS file. Working with the .SVG files is generally the same.

How to Convert Bitmap Illustrations to Vector for Free

Click here to view the tutorial on YouTube.

Here’s how to convert a bitmap illustration to a vector for easier editing.

This is a great application for doing some simple edits of your graphics. The price is especially great if you don’t have your own graphics editor. If you want to learn more, you can check out their learning resources here.

Events

Free E-Learning Resources

Want to learn more? Check out these articles and free resources in the community.

Here’s a great job board for e-learning, instructional design, and training jobs

Participate in the weekly e-learning challenges to sharpen your skills

Get your free PowerPoint templates and free graphics & stock images.

Lots of cool e-learning examples to check out and find inspiration.

Getting Started? This e-learning 101 series and the free e-books will help.


gamified e-learning template

Many of us are challenged to convert our linear content into something more interactive and engaging. I was digging through some old workshop files and stumbled upon one I built a while back but never ended up sharing it outside of the workshop. In the workshop activity, the objective was to not build completely from scratch. We started with an existing template that was shared in the community, and then we explored a few ways we could add some gamified elements to create something that is a bit more effective and engaging.

Here’s a breakdown of some ideas from the workshop activity.

From Linear Content to a Gamified Experience

We started with a nice clean template designed to meet the team. It’s interactive, in the sense that you click to learn about each team member. This is great for an exploratory interaction where you need to collect information.

Original Template Example

original meet team pre-gamified template gamify

See original template in action.

In our activity, we used the template as a mechanism to interview team members and collect information to make the right decisions. We also added some other elements to gamify it a bit.

Gamified Template Example

gamified template

Click here to view the gamified example.

Gamified Learning Challenge

The assumption is that there is some sort of challenge and the learner has to determine what to do. But first they need to collect information. They do this by interviewing the team members.

  • Each team member has something to say. Some of it is relevant, some not. That’s part of the learning experience. The learner will have to determine what’s what and whether the information is useful.

gamified e-learning interview

  • Each team member is assigned a point value. Some are low points and some higher.
  • You can only collect a specific number of points before you’re asked to stop. Thus, who you ask is important. You don’t want to waste time or opportunity. Another part of the learning experience.

gamified e-learning escorted out

  • The information you collect is added to a notebook and you’ll be able to review it later to make a more informed decision. Thus, the more information you have the better.

gamified e-learning notebook gamify

Gamified Template Modifications

Here’s a video tutorial where I walk through some of what I did to modify the template to go from the original meet the team structure to the gamified interaction. I’ve also included a download with the original and modified files.

  • There were ten possible interviews. We added a progress meter to track how many were interviewed. We used a number variable and added 1 for each interview.
  • Created a disabled state for each character so you can interview only once.
  • Collected information by clicking the star. This is tracked with a T/F variable that we use in the notebook to determine whether to display the interview content or not.
  • Added a notebook that shows which answers are collected. The notes have hidden states and the T/F variable is used to show the information that is collected.
  • Each character gets a point value. Too many points collected and you’re cut off. Used a number variable to track total points. Each interview adds X points to the variable. Once it exceeds 12 points, the interviews are stopped.

Gamified Learning Opportunities

There are a number of ways to create gamified learning experiences. Of course, this mock up isn’t complete, but here are a few things that I added to the template to increase engagement:

  • Put the content into a relevant context. Instead of just sharing information, frame everything around an event where the learner would use the information in real life.
  • Challenge the learner to make a decision. For the demo, it’s assumed something happened and the person needs to make a decision. To do so, they need to have all of the information. The more information, the better…maybe. Some of it could be false or irrelevant.
  • Create a means to explore and collect information. They can choose who to interview and what information is relevant and add it to the notebook for use later in the course.
  • Add risk and pressure. Choosing the wrong people means they collect less information and may not be able to complete the task. This is all part of the learning process: knowing what’s important and what’s not, and where to get the resources or correct information. Again, the demo isn’t completely developed, but you can see how this is important to decision-making opportunities.
  • The person gets to demonstrate their understanding of a given topic through the decision-making process and how they use resources. The decisions made produce consequences which create opportunities to add feedback and additional instruction.

I love doing this activity in the workshops. It forces us to work with the constraint of existing templates and find a few simple things we could do to make it a more meaningful and engaging learning experience.

Take the Gamified Template Challenge

Find a template (or a slide with content) that is mostly static or linear content. Convert that linear content into a decision-making interaction. What do you need to do? How do you do this at the speed of business where you don’t have the luxury of working from scratch or building the most complex gamified experience?

Events

Free E-Learning Resources

Want to learn more? Check out these articles and free resources in the community.

Here’s a great job board for e-learning, instructional design, and training jobs

Participate in the weekly e-learning challenges to sharpen your skills

Get your free PowerPoint templates and free graphics & stock images.

Lots of cool e-learning examples to check out and find inspiration.

Getting Started? This e-learning 101 series and the free e-books will help.


create animated gif

Animated .gifs are great for e-learning. Often, I like to use them instead of videos for e-learning interactions, especially process interactions that go through a sequence of steps.

Here are a few previous posts on animated .gifs with some free resources:

Today I’ll show a simple way to convert a video of a process into smaller animated .gifs that you can insert into a slide, article, or process interaction.

Demo of the Animated Gifs in a Process Interaction

Here’s a demo I created using Rise and the Process Interaction.


animated gif example

Click here to view the example.

Animated Gifs Tutorials

Below are a couple of tutorials that go into it in more detail:

Animated Gifs: Create a Procedural Video

Record a video of the process. Don’t worry about the audio as it will be removed. To keep the edits to a minimum, make sure to be clear on the steps and to not waste a lot of movement. Get to the point quickly.

At our workshop in Milan, David and I quickly recorded the process to make an espresso with the machine in the back of the room. While we pretended to be working, it was really a way for us to sneak in a few more shots of espresso.

Here’s the original video.

Click to play the video on YouTube.

Animated Gifs: Convert the Video to Gif

There are a number of ways to convert video to animated .gifs. I like to use ScreenToGif because it’s free (which is always good) and it is really easy to use.

The conversion process is simple: import the video and convert it. However, there are some key considerations.

The original .MP4 video is 159 MB at 1920 x 1080 resolution. Animated .gifs can be large, really large.  Without any significant edits, the 159 MB video becomes a 470 MB animated .gif. That’s just not manageable.

There are a few things you can do to decrease the file size of the animated .gifs:

  • Scale the video down from it’s original resolution. There’s no need for an HD quality .gif. In this case 1920 x 1080 will be sized down to 500 x 281.
  • Crop the video to just the critical pieces of info. The fewer frames the smaller the file size. You can always duplicate frames to keep something on screen longer with minimal impact to size.
  • The less difference there is with the pixels from one frame to the next, the smaller the file will be. Unfortunately, video isn’t static and those millions of pixels are changing from frame to frame. You could try to shoot against a solid background and with a tripod. That may help, depending on your subject.
  • Video runs at about 30 frames per second (FPS). When you convert the video to .gif, you can modify the frame rate to something like 10 to 15. It just depends on how much motion is in the video. The less motion, the more you can lower the frame rate.

Animated Gifs: Edit to Individual Steps

Unless the steps are very short and can be shown in one file, it makes sense to break the steps up to individual parts. That helps reduce the file size and keeps the focus on very specific parts of the process.

  • You can import the entire video and then cut it down. Or cut the video into smaller videos first and work with them individually. It’s probably easier to edit the videos first and then import the smaller videos. This is more manageable and less strain on your system.
  • Get rid of what you don’t need, cut out extra frames.
  • The animated .gifs loop, so it may make sense to add a little buffer at the front or back end to let the user orient to the start and end of the process.

The original video was 1 minute long. Converted to an animated .gif without edits, it was 470 MB. After cutting it into pieces and creating four smaller gifs, the total ended up being about 15 MB. That’s a pretty significant difference and the output works well for the demo.

That’s basically it, shoot a video and then convert it to animated gif.

Events

Free E-Learning Resources

Want to learn more? Check out these articles and free resources in the community.

Here’s a great job board for e-learning, instructional design, and training jobs

Participate in the weekly e-learning challenges to sharpen your skills

Get your free PowerPoint templates and free graphics & stock images.

Lots of cool e-learning examples to check out and find inspiration.

Getting Started? This e-learning 101 series and the free e-books will help.


PowerPoint tip graphics

Here’s a PowerPoint tip: build your e-learning course graphics in PowerPoint. PowerPoint is great for simple graphic design projects. In fact, I use it quite a bit for this blog and some of the graphics I need in my e-learning demos.

In a previous post, I shared visual design tips for graphics I built in Rise 360 for an e-learning scenario. All of those graphics were built in PowerPoint.

PowerPoint for graphic design example 5

In this example, the images all need to be wide, but short rectangles so that I could get them about the same height as the text and squeeze them as close as possible to the button stacks in Rise 360.

I created a custom slide size 13 x 4 inches. When I save the PowerPoint slides as images that results in an image that is 1280 x 384 pixels.

Here’s a detailed tutorial that walks through the process of creating similar graphics in PowerPoint. I cover a lot of little PowerPoint tips.

Click here to view the PowerPoint tutorial on YouTube.

The links below take you to specific parts of the tutorial. The last two links show how to create the final pill shape with the character’s head extended outside of the image.

The tutorial above shows how I created the images. But here are a few key points to consider.

PowerPoint Tip: Step Away from PowerPoint as a Presentation Tool

If you’ve read much of this blog, you know that I’m a big advocate for using PowerPoint to build simple graphics. It’s easy to use, most people have it, and there’s not much you can’t create with PowerPoint once you learn a few things.

Is it Photoshop or Illustrator? No! And if you have expertise with those tools, then have at it. But for those who don’t have a graphics editor and need a simple solution, give PowerPoint a try.

PowerPoint tip for e-learning graphics

Here are some previous posts that show what you can do:

PowerPoint Tip: Save Slides as Images

Whatever you build in PowerPoint you can right-click and save as an image. I usually save as .PNG. This preserves the color clarity and any transparency. If you save as .JPG, the transparent areas fill with white.

PowerPoint tip right click save as image

For most cases (especially when working with Rise 360), I like to use the slide as my entire image. So I build what I need and then save the slide as image rather than PPTX. While there are a number of image options, like above, I stick with .PNG.

PowerPoint tip save slide as image

PowerPoint Tip: Create Custom Slide Sizes

The default PowerPoint slide is 16 x 9 aspect ratio. In most cases that is fine. It works great for Rise 360. However, there may be times when you want a custom slide. For example, if you want a square image, you need to change the slide size. I usually use 10 inches by 10 inches which gives me an image that is close to 1000 x 1000 pixels (give or take).

Go to the Design Tab and select Slide Size to change the settings.

PowerPoint tip slide size

PowerPoint Tips: Install Studio 360

Many of you are you are using Articulate 360 which comes with Rise 360 and Storyline 360. Those are obviously the go-to apps for building courses. Because of this, many people ignore Studio 360 which comes with Articulate 360.

PowerPoint tip Characters

Even if you don’t use Studio 360 to build courses (why would you when you have Rise 360), it’s still a good idea to install it. The main reason is that you get access to all of the assets including the characters from Content Library 360. And when you build graphics for your e-learning courses, especially as I did in Rise 360, it helps to have all of the characters in PowerPoint.

If you aren’t using a graphics editor or don’t know how, then PowerPoint is a really easy way to build graphics for you e-learning courses.

Events

Free E-Learning Resources

Want to learn more? Check out these articles and free resources in the community.

Here’s a great job board for e-learning, instructional design, and training jobs

Participate in the weekly e-learning challenges to sharpen your skills

Get your free PowerPoint templates and free graphics & stock images.

Lots of cool e-learning examples to check out and find inspiration.

Getting Started? This e-learning 101 series and the free e-books will help.


e-learning tips

Even before I started working at Articulate, I made it a goal to answer five questions each week in the e-learning community. It’s a great way to connect with others, especially beginners, and offer some help as they’re learning.

However, for me, it’s a great way to stay on top of the tools as it forces me to think through the software in different contexts. It enables me to play around with different ideas and production techniques.

Here are three recent tutorials that I created to answer some questions in the community. The tutorials offer little bonus tips and focus on some production nuances that aren’t always apparent to new users. They’re good if you’re just getting started.

Here are the three files I used for the demos in case you want to look at them and follow along.

E-Learning Tip: Simulate Right-Click Interactions on Mobile Devices

In this tutorial, we review how to go through software training on a mobile device when the software simulation requires the user to right-click which isn’t possible on a mobile device.

Features demonstrated:

  • Setting True-False variables to indicate if the user is on a mobile device
  • Use variables to simulate right-clicking
  • Showing/hiding objects based on variable values

Click here to view the tutorial on YouTube.

E-Learning Tip: Combine Animations to Create Fast-Slow-Fast Animations

In this example, the question was how to make an object slow down when passing through another object and then speed up when it was done passing through.

Click here to view the tutorial on YouTube.

Features demonstrated:

  • Create motion paths
  • Set options
  • Apply relative start points
  • Relative animation
  • Alignment

E-Learning Tip: How to Keep Objects Persistent and as the Top Layer

In this tutorial, we look at how to ensure that the custom course navigation is always on the top layer and not hidden when going to other layers.

Features demonstrated:

  • Launch layer based on timeline
  • Create persistent layers on top of other layers
  • Use empty layers to trigger and redirect

Click here to view the tutorial on YouTube.

I usually do 5-10 of these tutorials every week. If they interest you and you want to see more, let me know.

Events

Free E-Learning Resources

Want to learn more? Check out these articles and free resources in the community.

Here’s a great job board for e-learning, instructional design, and training jobs

Participate in the weekly e-learning challenges to sharpen your skills

Get your free PowerPoint templates and free graphics & stock images.

Lots of cool e-learning examples to check out and find inspiration.

Getting Started? This e-learning 101 series and the free e-books will help.


E-Learning Variables 101

March 19th, 2019

Building e-learning courses is usually a matter of pulling together the appropriate content, visuals, and some level of interactivity. Most courses I see are linear with some simple interactions like tabs and labeled graphics.

However, there’s a way to make e-learning content and the learning experience more dynamic when using variables. Variables help create custom user experiences such as personalized visuals, conditional navigation, and adaptive learning paths.

The challenge for many e-learning developers (who aren’t experienced programmers) is learning more about variables and how to use them.

Today’s post is a recap of some previous getting started content that introduces the basics of working with variables, a few practice activities, and additional resources.

Also, be sure to check out our upcoming e-learning workshops below. I just added a bunch of new sessions.

Learn About Variables for E-Learning

Here are some previous blog posts that go through the basics of variables and how to use them.

Practice Activities to Learn About Variables for E-Learning

Here are some resources from previous workshops where we learn to use variables in a simple gamified context. There’s a published version with practice files and a series of tutorials that go through each slide individually. If you want to practice using variables and need some resources, this is a good place to start. You’ll only learn to use them when you use them.

variables 101 for e-learning example

See a published example.

Tutorials

E-Learning Community Activities to Practice Using Variables

Here some recent challenges to practice using variables in real-world contexts. Even if you can’t participate, look at some of the examples shared by community members.

Tutorials to Learn About Variables for E-Learning

variables 101 for e-learning

If you haven’t used variables before, now’s a good time to get started. If you do use variables, what do you find to be the most common use cases in your projects?

Events

Free E-Learning Resources

Want to learn more? Check out these articles and free resources in the community.

Here’s a great job board for e-learning, instructional design, and training jobs

Participate in the weekly e-learning challenges to sharpen your skills

Get your free PowerPoint templates and free graphics & stock images.

Lots of cool e-learning examples to check out and find inspiration.

Getting Started? This e-learning 101 series and the free e-books will help.