The Rapid Elearning Blog

Archive for the ‘Multimedia’ Category


Articulate Rapid E-learning Blog - 7 free audio editors

Even though many e-learning applications have their own audio tools, I usually don’t use them. I may for quick projects, but generally, I like to keep my audio production separate from my e-learning course production. It provides more control over the audio files and dedicated audio editing software tends to have more features.

Here’s a list of some free audio editors that are more than sufficient for what you may need for most of your e-learning course production. And the price is right.

Of course, working with audio isn’t necessarily as easy as plugging in a microphone and recording narration. I include links to the free software’s learning community to help you if you have detailed questions.
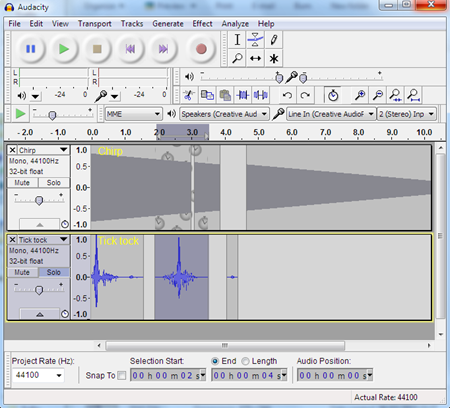
Audacity

Audacity is the most popular of the free audio editors. It’s open source with lots of users so that means there’s a lot of help available online. You can do quick basic recording or use the more advanced features for better audio editing.

Articulate Rapid E-learning Blog - free audio editor recording audacity

Ocenaudio

The interface for this is familiar and pretty easy to use to get started. As they say, it’s “easy to use, fast and functional audio editor. It is the ideal software for people who need to edit and analyze audio files without complications.”

 Articulate Rapid E-learning Blog - free audio editor recording ocenaudio

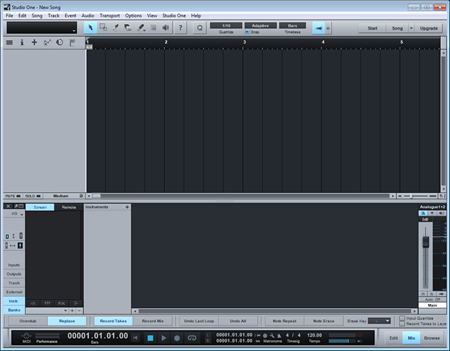
Presonus Studio One (free).

There’s a free and pro version. This is a nice application and a bit more sophisticated than what most of us are used to using. However, once you learn to use it you’ll have a lot you can do.
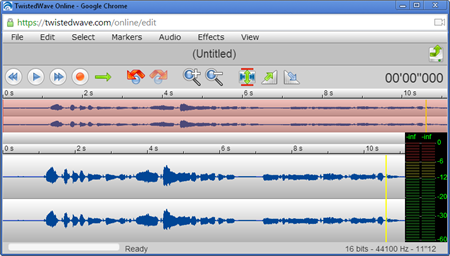
Articulate Rapid E-learning Blog - free audio editor recording presonus

TwistedWave (beta)

This is an online tool. The start page is a bit different than you might expect. To create a recording you click “new document.” This opens up an easy to use recording window. It is online and you can save to Google Drive.

I do like the ability to download and edit audio from Soundcloud.
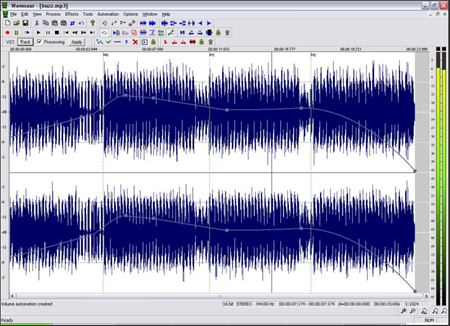
Articulate Rapid E-learning Blog - free audio editor recording twisted wave

Wavosaur

I just took a quick look at the free audio editor so I can’t speak to how easy it is to use. However, I know that there are a few blog readers who use it. Here’s how Wavosaur describes the tool: “a cool free sound editor, audio editor, wav editor software for editing, processing and recording sounds, wav and mp3 files. The program has no installer and doesn’t write in the registry. Use it as a free mp3 editor, for mastering, sound design.”
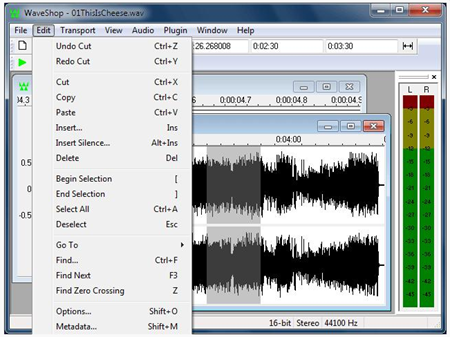
Articulate Rapid E-learning Blog - free audio editor recording wavosaur

WaveShop

This is another application I haven’t used yet, but was told about at a recent conference. It does bit perfect editing which apparently is important if you don’t want a corrupted dither; and who wants that?

Articulate Rapid E-learning Blog - free audio editor recording waveshop

There are a lot more free audio editors out there, but these are the ones I’ve personally used hear the most about from blog readers. And they’re not tied to non-commercial or freemium business models. That means you’re free to use them for the courses you produce at work.

*image via commons.wikimedia.org

Events

Free E-Learning Resources

Want to learn more? Check out these articles and free resources in the community.

Here’s a great job board for e-learning, instructional design, and training jobs

Participate in the weekly e-learning challenges to sharpen your skills

Get your free PowerPoint templates and free graphics & stock images.

Lots of cool e-learning examples to check out and find inspiration.

Getting Started? This e-learning 101 series and the free e-books will help.


Articulate Rapid E-Learning Blog - create hand-drawn graphics

Earlier we looked at the essential guide to visual thinking where we discussed how to communicate visually. Coupled with that post, we explored practical ways to apply visual thinking skills to e-learning course design.

One advantage of visual thinking is learning to see the concepts and how to express them to others. Another advantage is that you gain the skills to create real assets that can be used in your e-learning courses.

Today we’ll look at ways to create our own hand-drawn graphics. And of course, you can always download some free hand-drawn graphics in the community:

How to Practice Sketching Hand-Drawn Graphics

Hand-drawn objects can create a personal and organic look. They are a stark contrast to the sterile corporate look that is so common in many courses. This contrast and the organic look can be used to craft an engaging look for the course. You don’t have to be an artist to create and use hand-drawn images.  It just takes some practice.

Articulate Rapid E-Learning Blog - create hand-drawn graphics examples

A while back, Blair Rorani facilitated a Twitter Draw-a-Thon. Each day several people submitted their sketch of that day’s object. This was a good exercise to think about the objects and how to draw them.

One thing I learned was to streamline my drawings and use less to communicate more. I also tried to practice different face styles. As you can see, I’m not going to sustain a career in graphic design, but with some practice, I can create a few usable objects.

Start with Basic Shapes

Most objects are basic shapes, so you need to learn to see the basic shapes in the objects. Then practice drawing them. The more you practice, the better you get.

Articulate Rapid E-Learning Blog - create hand-drawn graphics by using basic shapes

Once you recognize the basic shapes, you’ll get better at streamlining your drawings. I find that the less detail, the better.

Practice Drawing Common Course Objects

There are a few objects that are common to many e-learning courses. Start by practicing sketching them. Break them into basic shapes and then see what you can sketch. Here are a few common objects to get started. Feel free to add to the list in the comments section.

  • File folder open & folder closed
  • Piece of paper & a stack of paper
  • Desktop & laptop computers
  • Envelope
  • Paper clip
  • Phones: mobile & stationary
  • Desk & overhead desktop
  • File cabinet
  • Whiteboard
  • Cork board

My Experience

As I mentioned in this blog post on overcoming instructional design challenges, Blair Rorani live sketched my presentation.

Articulate Rapid E-Learning Blog - essential guide to visual thinking example of instructional design

I liked what he did, so I tried my hand at live sketching at a workshop. You can see the results below.

Articulate Rapid E-Learning Blog - visual thinking ideas

What I learned:

  • Find inspiration from what you like and copy it. I liked Blair’s style, so my first step was to mimic what he did. Now that I feel more comfortable, I can begin to craft my own style.
  • My initial sketches took too long between capturing the big idea and trying to make it work with technology (I used the iPad and Adobe Ideas). However, once I completed a few of the sketches, I developed some basic procedures that helped make it faster.
  • Spend some time practicing before doing it live or as you sketch for your e-learning courses. One idea is to capture something going on at home. This would also probably produce a lot of laughs, too. Or just turn on the news and sketch what’s being discussed. The main point is to practice and to apply the basic concepts discussed above: use basic shapes to create objects and then practice sketching ideas.
  • Don’t worry about everything being perfect. Just do it. They look nice as they are and there’s something engaging about the organic look. However, I do recommend that you practice writing text, especially if you’re using an iPad. For the iPad I use the Cosmonaut stylus because the thicker pen helps me hold it more like I would on a whiteboard than on a piece of paper. I feel like I have more control when I draw. The newer PC tablets have pen input, and some come with a stylus.

We’re not all going to be artists who can crank out the best graphics. However, with some practice we can learn to communicate visually and streamline our graphics, so they do work in our courses (assuming the proper context).

Do you draw your own objects?

Events

Free E-Learning Resources

Want to learn more? Check out these articles and free resources in the community.

Here’s a great job board for e-learning, instructional design, and training jobs

Participate in the weekly e-learning challenges to sharpen your skills

Get your free PowerPoint templates and free graphics & stock images.

Lots of cool e-learning examples to check out and find inspiration.

Getting Started? This e-learning 101 series and the free e-books will help.


Articulate Rapid E-Learning Blog - free stock images for e-learning courses

If you’re using Articulate 360, you already get access to more than enough stock images. However, if you’re looking for a place to find more, one of my favorite sites for free stock images is Unsplash.com. They provide hundreds of free stock images with a Creative Commons Zero license. That means you can do anything with the images, whether free or commercial. And that’s a good deal for those of us who are on a tight budget.

Articulate Rapid E-Learning Blog - free stock images for e-learning courses in this example

As you can see above, I used one of the city images provided by Philipp Henzler for the Storyline tutorials. It works well in an e-learning context. I also used one of the free images for this free template that I shared a while back. You can download the free template it here.

Articulate Rapid E-Learning Blog - free stock images for e-learning courses used in this elearning demo

Click to view the free template in action

Unfortunately, while it’s great to get a boatload of free stock images, many of them are mostly decorative and hard to use for e-learning courses. And it does take some time to go through the whole kit and caboodle to find just the right images.

Download Free Stock Images

To save you time, I sorted through the images currently available and looked for the ones that had desks, tables, computers, and other generic elements that could work for e-learning courses. You can see a sampling below and download the curated free stock images here.

Articulate Rapid E-Learning Blog - thumbnail of free stock images for e-learning courses

How to Use the Free Stock Images

Obviously not all of the images will work for your courses, but with some creativity you can use of many of them. Here are a few thoughts on how to use them:

  • Content holders: use the computer screens as a place to put your content.

Articulate Rapid E-Learning Blog - how to use free stock images for e-learning courses

  • Zoom and crop: you don’t need to use the image as is. Feel free to crop or zoom to the parts that work.
  • Apply filters like blur, black and white, or recolor to get the effect you want. In the image below, I added a blur and character.

Articulate Rapid E-Learning Blog - add characters to the free stock images for e-learning courses

While I did curate the images to help save time, they did come from Unsplash. Be sure to give them some props. Thank you, Unsplash!

PS While you’re download those free stock images, grab these 54 free medical images, too.

Events

Free E-Learning Resources

Want to learn more? Check out these articles and free resources in the community.

Here’s a great job board for e-learning, instructional design, and training jobs

Participate in the weekly e-learning challenges to sharpen your skills

Get your free PowerPoint templates and free graphics & stock images.

Lots of cool e-learning examples to check out and find inspiration.

Getting Started? This e-learning 101 series and the free e-books will help.


360° Image e-learning

Storyline 360 includes a 360° image feature where one can insert interactive markers and labels. On top of that, one can also leverage all the other capabilities of Storyline and layer content on top of the image.

Last week, the e-learning challenge was to create some 360° image interactions. Some of the submissions intrigued me with how they used other layers and variables to track movement through the 360° image.

Here are four examples from the weekly challenge that demonstrate this:

360° Image Example: Once in a Lifetime

e-learning 360° images

This is a bit playful and outside the realm of e-learning, but what I like is that it’s a clever way to navigate through content. Each image represents one point of content versus a series of interactive markers and labels.

View 360° image example via Jonathan Hill

360° Image Example: Medical Industry

360° image example e-learning

This example shows some interesting ways to use variables throughout the interaction with the 360 image. It tracks movement, varies content displayed, and also includes some assessment.

View 360° image example via Montse Anderson

360° Image Example: Mi & Mo

360° Image example e-learning

This is another playful example that integrates animation and other layers rather than the default labels to collect information.

View 360° image example via Chris Hodgson

360° Image Example: Lotsen Station

360° Image

This demo is close to the type of interactions one might build in a real e-learning course. There’s layers of information and other clickable content, interactive dials, and an easy-to-spot quiz.

View 360° image example via Samuel Apata

This is just a sampling. There are a lot of other interesting ideas in the e-learning challenges, like this one with the fish animation. So be sure to check them out.

After looking at some of the demos, I am curious about how people actually use the 360° images in their e-learning courses. Are you using them to explore the office or facility? Are you using them to identify issues in the environment such as find the fire hazards? Or are you doing something novel?

If you use 360° in your courses, please share how you’re using them and any other recommendations.

Events

Free E-Learning Resources

Want to learn more? Check out these articles and free resources in the community.

Here’s a great job board for e-learning, instructional design, and training jobs

Participate in the weekly e-learning challenges to sharpen your skills

Get your free PowerPoint templates and free graphics & stock images.

Lots of cool e-learning examples to check out and find inspiration.

Getting Started? This e-learning 101 series and the free e-books will help.


extract image e-learning

When I create presentations for our webinars or workshops, I like to use the imagery from our e-learning community or the Articulate website. They’re on-brand and with the illustrations, we have a lot from which to choose. When I created training at previous organizations, I did something similar.

If you need to collect images from your company site to use in your training this tip should help.

Usually when I find an image, I right-click to save. However, this is a bit tedious.

website images

Here are two simple ways to see all the downloadable images and save them.

Image Extractor Extension

Use the image extractor extension in your browser. When you get to a page on your website, click the extension and it will isolate all the images. You can review what’s there and then download what you need.

free image extractor

Image Extractor Site

Another option is to use the Image Extractor site. Add a URL and it opens a browser via the server and extracts the images. It does an excellent job filtering images and removing tracking images. It also identifies the types of images and you can do a batch download.

image extractor

Here are a few considerations:

  • This is not intended to help you steal images and content from sites where you own no rights.
  • Be sure to properly credit sources.

There you go. Two simple ways to extract images from your website.

Events

Free E-Learning Resources

Want to learn more? Check out these articles and free resources in the community.

Here’s a great job board for e-learning, instructional design, and training jobs

Participate in the weekly e-learning challenges to sharpen your skills

Get your free PowerPoint templates and free graphics & stock images.

Lots of cool e-learning examples to check out and find inspiration.

Getting Started? This e-learning 101 series and the free e-books will help.


e-learning interactions

In a recent workshop on creating interactions, we looked at ways to take a single image and create interactive content. It’s a good practice activity because many of us aren’t graphic designers so it helps us see different ways to use stock imagery that doesn’t require a lot of editing. And it gets us to think about interactive content in ways we may not initially consider.

The general idea is to find a single image that you can use for an interaction. A few things I look for:

  • Visually interesting. I’m not a graphics designer and design fashion changes every few years. I try to find images that feel new and modern.
  • Content areas. Since I’m using a single image and it’s the unifying graphic, I look for places to add content. Sometimes it does require placing a box or some other container shape over the image, but I try to find open space in the image that works for content. In the three examples below, the computer has a good content area, the teens illustration has a middle section that is empty, and for the business collage I created a side panel.
  • Visual context. Try to find images that offer visual context so it fits the context of the course content. Generic things like offices and desks work great.

Here are three examples that we’ve covered in the past that demonstrate this idea of using a single image with some interactive elements.

Exploratory E-learning Interaction

zoom office e-learning interaction

Click here to view the demo interaction.

In this example, a single image provides some office-like context. This could be used as an exploratory interaction, when clicking on objects exposes additional content. Ask a question. Looks for clues to answer them.

Original post: Create an Interactive Course Using a Single Image includes free download.

Meet the Team E-Learning Interaction

meet team e-learning interaction

Click here to view the demo interaction.

The original example was used to highlight counting clicks with variables. However, the single image could be used to click on a character to glean more content such as a “meet the team” activity. The center area is a perfect place to display content.

Original post: E-Learning Tutorial – Easy Way to Make an Image Interactive

Business Collage E-Learning Interaction

business e-learning interaction

Click here to view the demo interaction.

I like these types of collage images because there are plenty of those types of images to be found. The original was built in PowerPoint. The demo above was rebuilt in Storyline. Here’s a download with both files if you want to deconstruct them.

Original post: Here’s a Simple Way to Convert Your Course to an Interactive Story

Hopefully, this gives you some inspiration. If you want a good starting point, do an image search for collages and you’ll find some interesting ideas.

Events

Free E-Learning Resources

Want to learn more? Check out these articles and free resources in the community.

Here’s a great job board for e-learning, instructional design, and training jobs

Participate in the weekly e-learning challenges to sharpen your skills

Get your free PowerPoint templates and free graphics & stock images.

Lots of cool e-learning examples to check out and find inspiration.

Getting Started? This e-learning 101 series and the free e-books will help.


audio narration tips

In e-learning software like Storyline 360 and Rise 360 you can record (or import) audio narration into your courses. Since many e-learning developers tend to produce all media that belongs in the course, recording audio narration usually is one of those responsibilities. That means there are a lot of people that record audio narration who aren’t trained voice over talent.

If you have money and the time, using professional voice over talent makes sense. But most of us don’t have that luxury. So here are some tips to help you get started and get the best audio narration that you can get.

Audio Narration Script

  • Script approval. Narration (especially for non-professionals) can be time-consuming. You don’t want to do a lot of re-work. Get the script approved before you start any work on recording the narration. That will save a lot of time.
  • Text-to-speech. Use the text-to-speech feature to create demo narration for the review process. This way the subject matter experts and reviewers can hear the script and not just read it. And if you need to make changes, it’s just a matter of typing new text and not going through the process of recording new narration. Settle on a final, signed-off script.
  • Sound like a real person. Audio narration should sound like a real person. That means you need to move past the legalese and corporate way of saying things (assuming the legal department lets you). Write a script that sounds conversational and how you would talk and explain things in real life.

The Right Environment to Record Audio Narration

In an ideal world, you have a recording studio or one of those fancy whisper rooms. But odds are you have a cubicle or empty conference room.

  • Cubicles are good. The walls are designed to absorb sound. Unfortunately, in an open-air cubicle farm, you don’t get a lot of privacy and there’s a lot of background noise, so you’ll need to record when there aren’t many people around.
  • Minimize noise. Turn off office machines, fans, and air conditioners (if possible). Record about 15 seconds of ambient noise. Sometimes you can use that to create a filter and edit out the background noise when you do post-production. But the best option is to record the best quality you can. As a general rule, the best recording is the original recording.
  • Use sound buffers. Listen to the difference between using a sound box and not. There are several ways to buffer the sound coming into your mic. There are professional options with sound proof panels, mic boxes (you can make these with a fabric cube and foam wedge panels), and panels that connect to your mic. In my home office, I have a clothes rack and drape a thick blanket over it. Then I roll it behind me. Here’s an emergency option: the foambrero. If you have a budget, this recording booth looks interesting and seems very portable and easy to set up in a small office.
  • Headset mic. Sometimes you’re stuck in an office and cannot control the background noise, but a headset mic helps because it is unidirectional and will only record audio from one direction. This helps block out a lot of ambient noise.

Prepare Yourself to Record Audio Narration

  • Read the script aloud a few times. You’ll quickly identify areas where it doesn’t sound natural and when it doesn’t roll of the tongue right.
  • Record it first so you can hear it back. Just the act of recording often helps identity where it doesn’t sound right and where you flub over words and sentences.
  • Drink plenty of water. Hydration is key.
  • Don’t worry about being perfect. Remember, you’re not hiring a pro, so you’re not getting a pro.
  • Stand rather than sit. Standing helps you breath better and take in more air. The most important thing is to be comfortable and of course being able to reach your audio controls between takes.

The Right Tools to Record Audio Narration

I created a list of good audio accessories and mic recommendations that won’t break the bank. And there are plenty of affordable or DIY options like building a sound box or using an Ikea lamp as a mic boom. Regardless, here’s a general rundown of what you’ll need:

  • Good microphone: headset or desktop. I usually prefer a desktop mic, but a headset is much more mobile and the sound quality is decent.
  • Pop filter to remove those annoying mouth sounds and popping p’s.
  • Mic stand. I use a boom mic mounted to my desk. I like to swing it in and out of position. The Blue Compass is a nice-looking boom if you don’t want to make your own or break the bank.
  • Teleprompter (better than reading from a paper script). A lot of people use a second monitor or tablet.
  • Sound buffer to control ambient noise and get fuller sound quality.

How to Record Audio Narration

I won’t go into a lot of detail about recording because there are a lot of different applications. But I will narrow it down to a few basic tips.

  • Record in the authoring tool or outside? You can always record much of the audio narration with the e-learning software. That makes it super easy, especially if you’re doing all the work by yourself. Storyline 360 even has a simple audio editor for some post-production editing. However, I prefer to separate my multimedia production into distinct groups: video, audio, graphics, and course construction. I find it helps keep me focused on one thing and I can get it done right the first time. Because of this, I like to record my narration outside of the authoring tools. Then I can make any edits I need and upload the narration into the software. This works in both Storyline 360 and Rise 360.
  • Free audio editors. If you don’t have any money, Audacity is a free audio application that works fine for recording narration. Here’s a list of a few other free audio recording options. Levelator (although no longer supported) does a respectable job cleaning up your audio narration. There are also all sorts of apps you can use on your phones and tablets to record audio (iOS and Android).
  • How to save audio files. You can save as .MP3 or .WAV. Both should be fine. MP3 files will be much smaller and you won’t notice any degradation. It’s also a good idea to have a consistent naming strategy when you save your files. “Audio1.mp3” isn’t very good. However, “Safety101-Intro-Layer4.mp3” makes a lot more sense and you know where it goes in the course when you have to import it.

These are some good, basic getting started tips when recording audio narration. If you have some to share, feel free to add them to the comments.

Events

Free E-Learning Resources

Want to learn more? Check out these articles and free resources in the community.

Here’s a great job board for e-learning, instructional design, and training jobs

Participate in the weekly e-learning challenges to sharpen your skills

Get your free PowerPoint templates and free graphics & stock images.

Lots of cool e-learning examples to check out and find inspiration.

Getting Started? This e-learning 101 series and the free e-books will help.


free icons

I love free icons and illustrations that can be used in e-learning. Here are some good ones for the health and medical industries courtesy of Health Icons. What’s cool is that the icons are open source and free to use in commercial projects without any attribution requirement.

Why are the icons free?

Health Icons is a volunteer effort to create a ‘global good’ for health projects all over the world. These icons are available in the public domain for use in any type of project. The project is hosted by the public health not-for-profit Resolve to Save Lives as an expression of our commitment to offer the icons for free, forever.”

free icons

How do I give credit for the free icons?

Even though they don’t ask for attribution, I think it’s good to spread the word and give them credit where possible. Here’s a post I shared earlier on different ways to share attribution of resources in your e-learning courses.

free icons ideas

What can I share for free?

Also, while we’re on the topic of doing good, have you given blood yet? It’s easy to do, doesn’t cost much, and saves lives.

Hope these icons come in handy. And thanks to the volunteers who put them together.

Events

Free E-Learning Resources

Want to learn more? Check out these articles and free resources in the community.

Here’s a great job board for e-learning, instructional design, and training jobs

Participate in the weekly e-learning challenges to sharpen your skills

Get your free PowerPoint templates and free graphics & stock images.

Lots of cool e-learning examples to check out and find inspiration.

Getting Started? This e-learning 101 series and the free e-books will help.


branded-e-learning-quote

One of the big challenges when building courses is having to deal with organization’s brand and visual identity and figuring out how to work it into the course. And to do it in a way so the course doesn’t look like a billboard or race car.

Here are some quick tips on how to incorporate the company’s brand into your courses without being overly intrusive on the learning objectives and actual course content.

Get Rid of the Branding

Before we get started, here’s a question worthy of debate: do you really need to brand your courses? What does it accomplish? Does it make a better learning experience? I understand the need for good looking design and meeting the organization’s need that way. But how does all of that branding fit into meeting the learning objectives (assuming there are some)?

I’ve built plenty of courses over the years and have spent more than enough hours with the customers and marketing folks. So I know all the reasons we have for adding the brand content to our courses. I just wonder if it really matters and what value it adds.

What do you think?

With that said here are a few ways to work your brand into the course that avoids some of the internal bickering and doesn’t get you fired. For this post, I’m going to use the E-learning Heroes community for my examples.

e-learning-community-1

Create a Landing Page

Instead of a course that features a logo and design on each screen, create a single-entry point that provides the branding info at the beginning of the course. After that, reserve the rest of the course for the learning part of the e-learning.

You can do this by creating a landing page or gate screen. The branding is offered upfront, and the rest of the course is mostly devoid of it.

  • Landing Pages. Do a search for landing pages to get some ideas on design and layout. And then build one for your organization. Use it at the beginning of all your courses.
  • Gate Screens. Build a gate screen. You can use one at the beginning or use them between sections or modules.

e-learning-screen-layouts-1

Above are some quick mockups based on the community page. I know a few companies that do this. I think it’s a workable solution because it adds the branding info that marketing and management requests. But it also reserves the rest of the screen space for the learning content and interactions.

Optimize the Player

Most e-learning courses include a player; and that player can be customized to some extent. What are the main brand elements for you to consider and how can they be incorporated into the player?

Generally, the visual part of the brand deals with some images like a logos and backgrounds, color schemes, typography, visual design, and screen layouts.

  • Incorporate the organization’s brand by colorizing the template to match the color schemes.
  • Leverage the logo or presenter panels for the company logo. Those can remain persistent which helps with the clients that want the logo on every screen.
  • Use the same (or similar fonts). Few corporate fonts are standard system fonts. Ask for the “official” font or try to find a similar one using What the Font. Often you can find comparable fonts that are free via Google Web Fonts. Most people won’t notice the subtle difference. And if they do, just tell them you’re using the “official” font for e-learning courses.

Mimic the Organization’s Web Site

Changing player colors and adding logos is easy enough. The more challenging issue is capturing the right visual design, especially if the organization’s made an investment to project a specific look and feel for the brand. And this is critical if what you build is presented outside the organization.

Ideally, you get the organization to help you brand the courses. But the reality is most of us won’t get access to a graphic designer to help. Considering this, here are a few ways you can glean the organization’s branding from the web site where they did hire a graphic designer.

  • Buttons are common. Each site has some sort of button or tab. Recreate those by copying their different states such as normal, hover, down, and selected.

buttons

  • Identify a few core screen layouts based on the web site. Make note of the way the items are arranged, especially things like white space and margins.
  • Look for potential content holders. I look for those individual elements like boxes and side panels that could become content holders or interactive items.
  • Where are the interactive elements? There are three things we do to interact with the screen: click, hover, and drag. How are those used in the website? Try to recreate them in your e-learning application. And if there aren’t interactive elements, what can you make interactive? For example, instead of static box, it has a hover state when moused over.
  • Colors are key. The company website already has an official brand. Mimic the general layout and use the correct colors. Here’s a more detailed post on how you can color pick colors or upload a screenshot of the site and have one of those color scheming sites pick colors for you.

sample-color-palette

If you need to brand your courses, these three suggestions should help. Start simple with a landing page and work your brand into the player and course screens by mimicking the organization’s web site and color schemes.

What do you do to incorporate the company’s brand into your courses?

Events

Free E-Learning Resources

Want to learn more? Check out these articles and free resources in the community.

Here’s a great job board for e-learning, instructional design, and training jobs

Participate in the weekly e-learning challenges to sharpen your skills

Get your free PowerPoint templates and free graphics & stock images.

Lots of cool e-learning examples to check out and find inspiration.

Getting Started? This e-learning 101 series and the free e-books will help.


closed aptions for e-learning

A guest post by Elizabeth Pawlicki, Training Program Manager, Articulate.

If you’re a Google Chrome 89+ user you now have access to Live Caption which is an accessibility feature that provides real-time captions for audio that plays through the browser.

This is a really excellent feature for audio that runs through your browser when viewing courses that have videos or narration, especially if the audio doesn’t have captions. Check it out below.

Initial Thoughts on Google Live Caption

I tested the Live Captions on a few different e-learning products that had audio including courses in Storyline 360, Rise 360, and Review 360. The captions worked well, surprisingly well, as you can see in the image below.

Google Live Caption demo closed captions

I also like that even if you turn off the audio, the captions work. As a user I am no longer constrained by whether or not the audio I am consuming has closed captions built-in to the product. The browser does the heavy lifting.

This is a big step forward for those who require captioned audio. I look forward to how this feature evolves going forward.

How to Access Google Live Caption

Google Live Caption closed captions

  • First, make sure you’re using Google Chrome 89 or higher.
  • Click the three dots on the top right.
  • Then go to Settings and select Advanced>Accessibility.
  • Click the toggle for Live Caption.

Once you have enabled Live Caption, you’ll see an option to toggle the captions on and off without going in and out of the settings.

Google Live Caption closed captions toggle

Key Considerations for Google Live Caption

  • This tip requires Google Chrome 89 or above. If you have learners who need captions and you can’t provide them in time, you at least have the option to recommend Chrome 89.
  • It’s a new feature so there are some limitations such as size, position, and language. However, I assume the feature will be enhanced and my guess is other browsers will play catch up.
  • From what I can tell the caption choices in Windows OS don’t seem to impact the captions displayed in the browser.

Google Live Caption is a step in the right direction and a great tool for those who need captions when they’re not provided.


Events

Free E-Learning Resources

Want to learn more? Check out these articles and free resources in the community.

Here’s a great job board for e-learning, instructional design, and training jobs

Participate in the weekly e-learning challenges to sharpen your skills

Get your free PowerPoint templates and free graphics & stock images.

Lots of cool e-learning examples to check out and find inspiration.

Getting Started? This e-learning 101 series and the free e-books will help.


multimedia

E-learning courses are mostly screens of content made up of media: text, shapes, illustrations, pictures, and video.

Adding those things to your course is simple, usually just a matter of inserting said media onto the screen. However, building a cohesive course is more than just inserting stuff on a screen. There are other considerations.

Design the Look of the E-Learning Course

What’s on a screen?

  • Fonts. They are more than the text you read; they’re also a graphic. Which fonts are you using in your course? Are they contextually aligned with your content?
  • Shapes. Shapes can have straight edges or rounded; they can have outlines or not. The shape can represent something elegant or informal.
  • Illustrations. There are all sorts of illustrative styles. One popular style today is the corporate Memphis look. Of course, there are many designers who find it to be barren.

And this brings us to a key consideration when working with multimedia: the bullet points above speak to some visual design requirements. Who will design what you need? What is the correct imagery and use of fonts and desired color schemes?

A challenge for many e-learning developers: having ideas about what you want and executing on those ideas is not the same. I see lots of good courses that are not designed well. The cause is usually that the e-learning developer lacks the technical skill to construct the right media.

Create Audio and Video Resources

There are similar considerations for other multimedia such audio and video.

Recording audio is easy and straightforward in most of the authoring tools. However, they don’t tend to have a lot of sophistication when it comes to editing or managing the audio.

For simple audio, recording from the authoring tool is fine. But for longer audio, there are considerations about how to record, who will record it, and how it’s all managed.

You can do it all in-house or DIY, but you do get what you pay for. I figure non-professional talent gives you presentation quality audio. It’s inexpensive, gets the job done, yet isn’t going to be perfect. But it’s not the same as pro-quality narration.

The good thing today is that there are many voice over artists and talent services where getting professional audio at a reasonable cost is viable.

Video is another one of those tricky issues. Today’s smart phones have better capabilities than I had doing professional video work 25 years ago. It’s easy to shoot video and edit it. But there is a significant difference between a DIY video and getting something done professionally. Or at a minimum, spending time on edits to get things to look right and not drag on.

The big question for any of the course’s multimedia is who is going to determine and design what you need? And then who is going to produce the media?

I throw this out because the course will look like something. And you’ll put something on the screen. And there’s a cost associated with it. Doing it yourself may cost less money but may impact the quality of what you produce.

Thus, at the beginning of the project time needs to be spent on the media requirements and production considerations. And then determine if there needs to be a budget to accommodate those requirements.

How do you determine those things when you start an e-learning project?

Events

Free E-Learning Resources

Want to learn more? Check out these articles and free resources in the community.

Here’s a great job board for e-learning, instructional design, and training jobs

Participate in the weekly e-learning challenges to sharpen your skills

Get your free PowerPoint templates and free graphics & stock images.

Lots of cool e-learning examples to check out and find inspiration.

Getting Started? This e-learning 101 series and the free e-books will help.


PowerPoint tip

Here’s a cool PowerPoint hack. I had an illustrated character and needed a font style that matched the illustration style. To get the effect I used PowerPoint to create a title font and changed the format. In this post, I’ll show you how.

Free Illustrations for E-Learning

I used one of the free illustrations from Blush which is a great site for illustrations. The paid account gives you a bunch of options to customize. As you can see, the illustration style is organic and looks a little hand-drawn.

free illustration

Creating Matching Font Style in PowerPoint

As you can see below, I added a big, bold font for effect. It’s OK. But how do I get a font to match the illustration style?

PowerPoint hack

Convert Font into Vector Graphics

The first step is to convert the type into separate graphics. In PowerPoint, you need at least two objects selected. I created a temporary oval shape.

Then go to Shape Format > Merge Shapes > select Fragment. That converts each letter into a shape that can be modified and edited.

PowerPoint

Assign Colors to the Objects

Once the letters are individual shapes, you can fill them with any color and change the line stroke. In this case I color picked the blue from the illustration for the fill and color picked the hair for the line color.

Then I used the format painter to apply the colors to the other letters.

Apply a Sketched Line

Adding the organic, hand-drawn effect is a matter of using one of the sketched line options in PowerPoint. I applied a line style that works.

Then made the line size larger to match the illustration. And format painted onto the other shapes.

Whatever you create can be saved as an image. To do so, select the object and right-click to save as image. Or got to the file saves as options and save the slide itself as an image.

PowerPoint Tutorial

Here’s a video tutorial that walks through these steps in more detail.

There you go: a really easy way to convert the regular type to individual vector shapes that can be edited to match the original illustration.

Events

Free E-Learning Resources

Want to learn more? Check out these articles and free resources in the community.

Here’s a great job board for e-learning, instructional design, and training jobs

Participate in the weekly e-learning challenges to sharpen your skills

Get your free PowerPoint templates and free graphics & stock images.

Lots of cool e-learning examples to check out and find inspiration.

Getting Started? This e-learning 101 series and the free e-books will help.